|
On the main screen toolbar, click on the arrow located next to the  button and select the Problem option. button and select the Problem option.
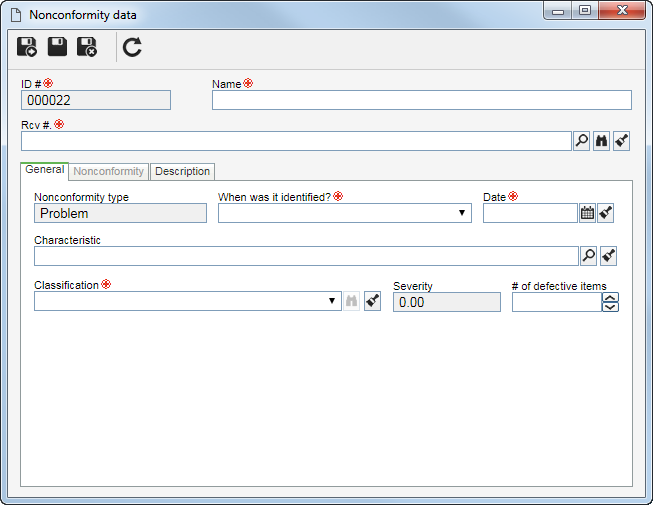
Fill in the data of the following screen that will be displayed:

Fields
|
ID #
|
This field is automatically filled out by the system with the nonconformity identification number.
|
Name
|
Enter a title for the nonconformity.
|
Rcv #.
|
Select the receiving where the nonconformity happened. If the NC is being created through the inspection data screen, then this field will be filled automatically by the system with the receiving number where the nonconformity is being created.
|
If in the general parameters the "Recalculate indexes when a nonconformity is added for closed receiving" option is checked, when you create a nonconformity in a closed receiving, the indicators from the date of the receiving will be affected, because the system will then again perform the index calculations of the corresponding receiving.
|
The following tabs will be available:
Fields
|
Nonconformity type
|
This field is automatically filled out with the selected nonconformity type.
|
When was it identified?
|
Enter if the nonconformity was identified during the receiving, after the receiving or at the customer.
|
Date
|
Enter the date on which the nonconformity was identified.
|
Characteristic
|
Select the characteristic in which the nonconformity was identified
|
Classification
|
Select the type which classifies the severity of the nonconformity.
|
Severity
|
Value of the severity of the nonconformity. This field is automatically filled out by the system according to the value set in the selected classification.
|
# of defective items
|
Enter the quantity of defective items found in the receiving.
|
If the NC is being created through the inspection data screen, then some fields will be displayed to identify the object of the receiving and its respective revision. These fields will also be displayed after saving the record for the first time. If the form object, in which was held the receiving, is Raw material, Service or External finished product then, the supplier will be displayed.
|
Nonconformity
|
Associate the problem in which the control of the nonconformity will be done. To do that, use the following buttons, available in this tab:

|
Click on this button to create a new problem to control the nonconformity identified in the receiving. On the screen that opens, select the problem type, the title and save. For more details on how to create a problem, see the documentation of the SE Problem component.
|

|
Click on this button to associate an existing problem to control the nonconformity identified in the receiving. On the screen that opens, use the search filters to find the desired problem. Then, select the incident and save the selection.
|

|
Click on this button to view the data of the problem selected on this screen.
|

|
Click on this button to view the flowchart of the problem. The flowchart displays the executed flow in addition to highlighting the activity that is enabled for execution.
|

|
Click on this button to remove the association of the problem with the nonconformity in question.
|
|
Description
|
Use this tab to enter the details about the nonconformity.
|
Save the record.
|


