|
See below how to revise an item:
Remember that, to be able to revise the item, it is necessary to meet the following conditions:
▪The revision control must be properly configured for each item type. ▪The last revision of the item must be finished. |
1.Use the Search filters panel to locate more easily the item that will be revised.
2.Select the item that will be revised and click on the  button on the toolbar. At this point, the revision data screen will be displayed: button on the toolbar. At this point, the revision data screen will be displayed:
Field
|
Item type
|
Type the item being revised belongs to.
|
ID #:
|
Number or code that identifies the item being revised.
|
Item
|
Name of the item being revised.
|
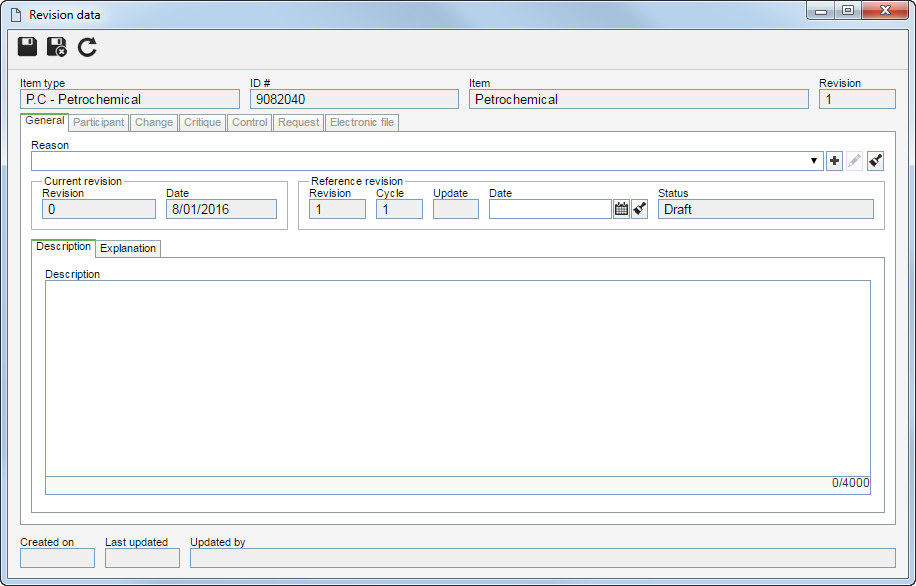
3.The General tab contains general information about the item revision. Fill in the following fields:
Field
|
Reason
|
Select the reason that led to the opening of the revision.
|
Current revision
|
The following fields are available referring to the current revision of the item:
▪Revision: Number of the current revision of the item. ▪Date: Date of the current revision of the item. |
Reference revision
|
The following fields are available referring to the reference revision of the item:
▪Revision: Number of the revision being created. The way to fill this field in varies according to the identifier defined for the revisions of the items of this type. oCycle: This field is filled in by the system, varying according to the revision method: oISO9000 based: Whenever a participant rejects the item revision, the system increases the number in this field by one. ▪Workflow: Whenever the activity that is configured to start a new cycle is enabled for the due responsible party, the system increases the number in this field by one. ▪Date: Enter the date of the reference revision of the item. ▪Status: Indicates the status of the revision. |
Description
|
This field is located inside the Description subtab. Use this field to enter additional descriptions of the revision of the item.
|
Explanation
|
This field is located inside the Explanation subtab. Use this field to justify the item revision.
|
4.Save the record after entering all the necessary information, but do not close data screen. At this point, the other tabs will be enabled. Follow the description in the next sections.
If the structure of the item that will be revised is from other items, when saving the revision data for the first time, the system will display a specific screen for it to be possible to also revise the structure.
|
5.If the item being revised has a structure, the system will display a screen to select the child items (lower level items) that should also be revised. For that, in the structure panel, select the structure items that should also be revised:
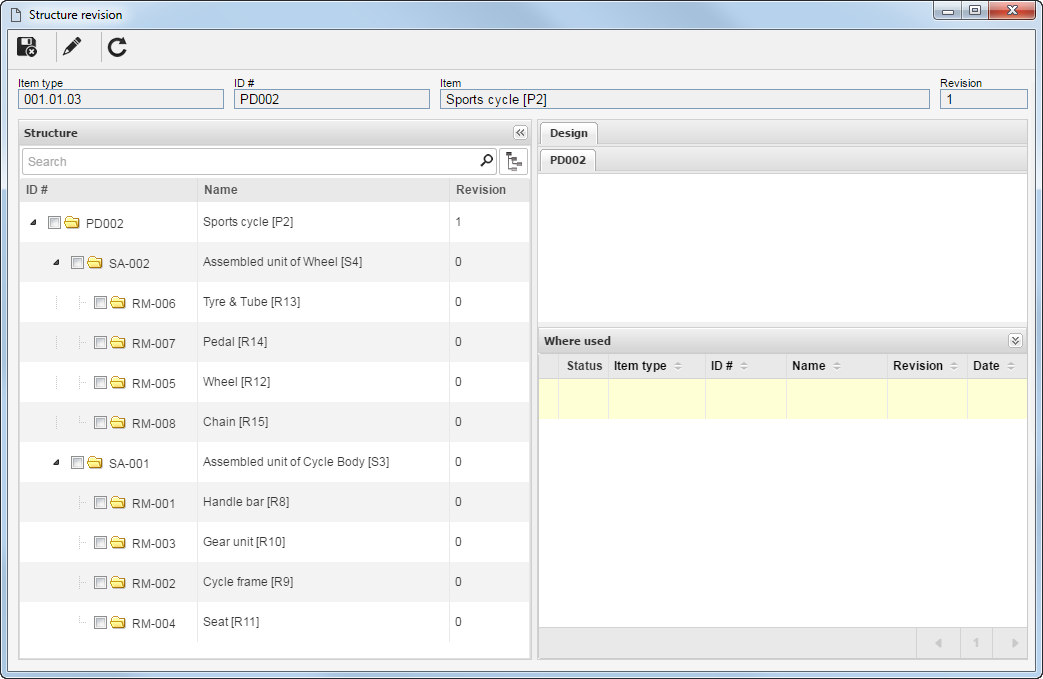
▪To continue editing the revision data, click on the 'Edit' button on the structure revision screen. ▪Save the structure revision screen after selecting the items that will also be revised. |
The Participant tab will be displayed for item revisions whose type has been configured as ISO9000 based. Filling in the information in this section depends on the Route type selected in the item type. If it is a "Fixed & unique" route, this section may not be edited. If it is a "Fixed" route, participants may only be selected through a revision route. If it is a "Variable" route, the participants may only be selected through a route or through the buttons in the Step sub-tab.
Field
|
Cycle
|
Displays information about the cycle the revision is in. Remember that a cycle is started in each new revision. Click on the  button to import a revision route already created through the Configuration button to import a revision route already created through the Configuration  Revision Route menu. At this point, the participants will be displayed in the Step sub-tab. Revision Route menu. At this point, the participants will be displayed in the Step sub-tab.
|
Status
|
Displays the "Under revision" status while the revision is in progress. After the revision is released, displays the "Finished" status.
|
Start
|
Displays the date on which the revision was created.
|
End
|
Displays the closure date of the revision.
|
Closure
|
Displays the data of the user who finished the revision. If the closure is automatic, the name of the user who executed the last configured revision step will be informed.
|
In the Step sub-tab, it is possible to view/establish the participants of the item revision route, according to the type definitions performed in the document category in question. If the configured route type is Variable and a revision route is entered, the system will display its participants in the list of records on this tab, allowing changes to be made to the participants. In case a revision route has not been entered, it is possible to configure the desired participants. For that, use the buttons on the toolbar located next to the list of records:
|
Click on this button to add a participant. On the selection screen, fill in the necessary fields to locate the desired participant. Enter the step the participant will be responsible for and, if needed, enter the checklist that must be answered by the participant when executing the revision. While selecting the participant, it will also be required to enter the deadline to execute the revision step and the sequence, if there is more than one participant for the same step. After that, just save your selection and repeat this process to add other participants.
|

|
Click on this button to edit the participant sequence, deadline, or checklist.
|

|
Click on this button to remove the selected participant. Remember that it will not be possible to remove those participants who have already received the revision execution task.
|
▪Regardless of the Route type, it will not be possible to add, edit, or remove participants from those steps that have already been executed. ▪The system also displays the following subtabs: Flowchart (displays the flow of responsible parties), History (allows tracking the operations performed in the item during the revision), and Checklist (will only be enabled if a checklist is associated with the participant selected from the Step subtab and allows viewing the data and the answers entered by the user, if one has already executed the step for which one was responsible). |
▪The Workflow tab will be displayed, instead of the Participant tab, for item revisions controlled by a process instantiated in the SE Workflow component. The details of how to fill out the fields in this tab and how to configure a revision process are found in the Revision process section. |
7.On the Change tab, click on the button to enter the changes that have been made to the item being revised. The changes may be entered both by the user creating the revision or by its drafters, through the draft step in the Revision task. On the screen that will be displayed, fill in the following fields:
Field
|
Location
|
Location of the item in which the change was made.
|
Change
|
Description of the change made to the item.
|
8.On the Critique tab, click on the button to enter the critiques regarding the revision in question. The critiques may be entered both by the user creating the revision and by its reviewers, approvers, and/or releasers. On the screen that will be displayed, fill out the following fields:
Field
|
Description (Critique tab)
|
Inform the improvements to be implemented in the item being revised. Filling out this field when returning a revision to the draft step will be mandatory if the "Require critiques to be filled out when revision is rejected" option is checked in the general parameters.
|
Solution (Solution tab)
|
When a critique has been recorded, this field must be used to inform the solutions that have been applied to the item. This tab can only be filled by the drafter, through the drafting step in the Revision task.
|
9.The Control tab displays the parties responsible for creating and releasing the revision. The following fields are also available:
Field
|
Planned
|
Scheduled start and end dates of the revision.
|
Actual
|
Actual start and end dates of the revision.
|
Revision publication
|
This field is filled out by the system with the closure configuration set in the item type being revised; however, it is possible to edit it while the revision is open. If needed, change the way the revision will be finished:
▪Automatic: The moment in which the releaser releases a task, the revision will automatically be finished, without generating the revision closure task ▪Manual: The moment in which the releaser releases a task, the revision closure task will be sent to the user who created the revision. |
Responsible
|
This field is filled out with the user and date on which the revision was created and with the user and date on which the revision was released, i.e., when its closure was executed. If the closure is automatic, the name of the user who executed the last configured revision step will be informed.
|
10. On the Request tab, it is possible to associate an item revision request with the revision being created, indicating that it has been executed. To do that, click on the button and, on the screen that will be displayed, select the request regarding the revision in question and save the record. Use the other buttons located on the right side of this tab to view the request data or dissociate a request from the revision in question. On the Request tab, it is possible to associate an item revision request with the revision being created, indicating that it has been executed. To do that, click on the button and, on the screen that will be displayed, select the request regarding the revision in question and save the record. Use the other buttons located on the right side of this tab to view the request data or dissociate a request from the revision in question.
▪For this resource to work correctly, the SE Request component must have an active license key in SE Suite. ▪If no request executes the revision in question, this tab screen may be disregarded. |
▪Item revision requests must be issued through the SE Request component. Whereas the execution of requests may be performed through this tab or through the Revision request task. ▪See the specific documentation of the SE Request component for more information on the issuance of requests. |
11.In the Electronic file, it is possible to perform the association of the electronic files to the document revision in question. For that, use the buttons on the side toolbar as needed:
|
Click on this button to associate an electronic file. See further details in the Associating electronic files section.
|

|
Click on this button to scan the desired electronic file. Remember that, for that, it is necessary to have an installed scanner with support for the TWAIN standard.
|
|
Click on this button to delete an electronic file associated with the item. Remember that, to perform this operation, it is necessary to have the corresponding permission enabled in the type security and the deletion of electronic files must not blocked in the archiving configuration.
|

|
Add this button to view the content of the electronic files of the image type (including .dwg and .dxf files) associated with the item in question. it Is important to point out that, for the other file formats, the system will only display the icon with the name of the electronic file.
|

|
Click on this button to download the electronic file of an item. Select the desired record before clicking on the button.
|

|
This button will only be displayed when the item does not have any electronic file associated with it. When clicking on this button, the system displays the selection screen to import a template associated with the item type to be used in the item in question. It is important to point out that only the templates associated with the item type will be available for selection. If there is no template associated with the type, the system will issue an error message.
|

|
Click on this button to view the electronic file selected in the list of records.
|
12.After filling in the fields on the screen above, click on the  button. At this point, the revision task will be generated. See further details in the Execute revisions section. button. At this point, the revision task will be generated. See further details in the Execute revisions section.
|