|
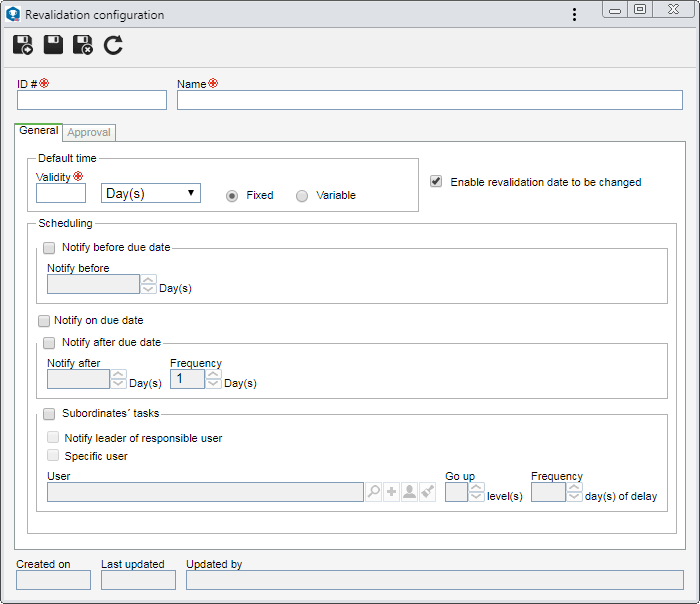
On the main screen toolbar, click on the  button and fill out the data on the screen that will be displayed: button and fill out the data on the screen that will be displayed:

ID #: Enter a number or code for the validity configuration.
Name: Enter a name for the validity configuration.
After that, save the record. The following tabs will be enabled to have their fields filled out:
On this tab, set the configurations regarding the validity of the requirements and notifications that will be sent to interested parties when it expires. To do that, fill out the following fields:
Default time
|
Validity
|
Define the amount of time in day(s), month(s), or year(s) for the requirement validity. The default time is counted from the requirement revision date, thus, when this time expires, the Past due requirement task will be generated for those responsible, in order for its revalidation to be performed according to the settings made in the requirement. Define also the default time according to the descriptions below.
|
Fixed
|
At the time of the requirement revalidation, the Validity field will be filled out by the system with the default time and cannot be edited.
|
Variable
|
At the time of the requirement revalidation, the Validity field will be filled out by the system with the default time, but it will be possible to edit it.
|
Enable revalidation date to be changed
|
Check this option so that, when revalidating the requirement, it is possible to edit the Date field. If this option is not checked, the field will be automatically filled out and may not be edited.
|
In the following section, it is possible to schedule notifications that will be sent via email, as well as defining the addressees and whether they will be sent before or after the requirement due date. To do that, fill out the following fields:
Scheduling
|
Notify before due date
|
Check this field so that the notification for the Past due requirement task is sent before the day on which the default time set for the requirement expires. Use the Notify before field to enter how many days in advance the notification will be sent.
|
Notify on due date
|
Check this field so that the notification for the Past due requirement task is sent on the same day on which the default time set for the requirement expires.
|
Notify after due date
|
Check this field so that the notification for the Past due requirement task is sent after the day on which the default time set for the requirement expires. In the Notify after field, enter how many days after the requirement expires the notification will be sent, and in the Frequency field, in days, enter the frequency with which this notification will be sent.
|
Subordinates' tasks
|
Check this option so that it is possible to send subordinates' tasks notifications to the responsible leader or to a specific user. By checking the Specific user option, it will be possible to configure the notification schedule, that is, in the Go up __ levels field, enter how many levels above the specific user will receive the Past due requirement task delay notifications. In the Frequency field, enter the number of delay days that will be used as a trigger to notify the next level up to the limit indicated in the field above.
|
If the "Default time" is later changed in the validity setting, this change will be applied in the next revision (provided it is Fixed) or revalidation of the requirements already recorded and for the new requirements that are created in the type in question.
|
The scheduling will be executed daily, according to the grouping and the time defined in the SE Configuration component (Configuration menu  Notification menu Notification menu  System notifications section), unless if, in the scheduling configured in this screen, the Leader or the Specific user is selected in the 'Addressee' field. In this case, the grouping configuration (SE Configuration) will not be respected, which makes the notifications generated by the scheduling in this screen to always be sent without grouping. System notifications section), unless if, in the scheduling configured in this screen, the Leader or the Specific user is selected in the 'Addressee' field. In this case, the grouping configuration (SE Configuration) will not be respected, which makes the notifications generated by the scheduling in this screen to always be sent without grouping.
|
|
Define whether the revalidation of the requirement will go through approval and who will be responsible for this step. To do that, check the Approve option and select whether the responsibility route for the approval will be:
Field
|
Variable
|
Allows the approval route to be selected/edited during revalidation, in addition to allowing its members to be edited.
|
Fixed
|
Allows the approval route to be selected/edited during revalidation; however, it will not be possible to edit its members.
|
Fixed & unique
|
A default approval route will be established for the revalidation approval of ALL requirements of the type, that is, the route selected in the Route field cannot be changed (not even its members) at the time of the revalidation.
|
Responsibility route
|
Select, among those saved in the system, the responsibility route for the approval of the revalidation. If needed, use the buttons placed next to the field to create a new responsibility route or clear the entered value, respectively.
|
|
Save the record after filling in the necessary fields.
|
|


