|
See how to execute a control test:
The control tests may only be executed if the risk plan in question has released or current revision status.
|
1. 
|
 Select the control test to be executed on the main screen and click on the Select the control test to be executed on the main screen and click on the  toolbar button. toolbar button.
|
2.
|
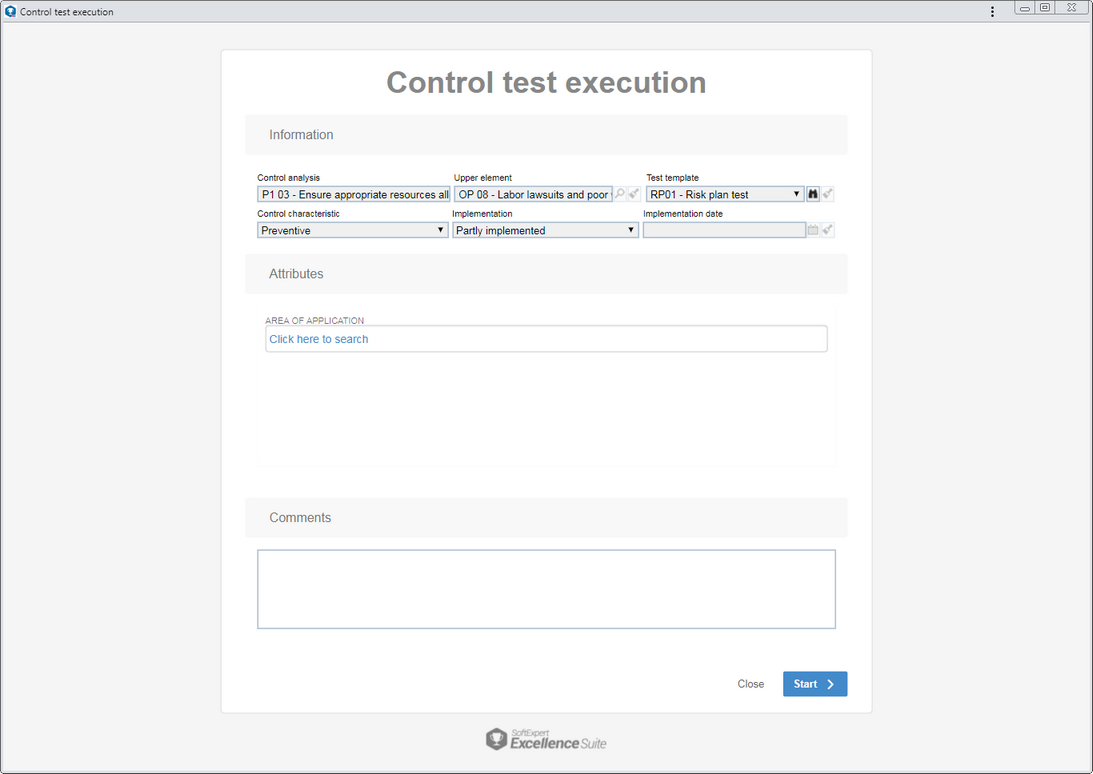
The test plan execution screen will be displayed. In it, the information of the control analysis of which the test is part will be displayed:

Attributes: If during the test plan configuration attributes have been associated in the "Test execution attributes" section, they will be displayed on this screen, making it possible for them to be identified by their names. In that case, enter their values. Required attributes must, necessarily, have their values filled in. The blocked attributes will be filled by the system according to the default value set when associating it with the plan type. Remember that the procedure to fill an attribute varies according to the configurations established during its creation.
Comments: Use this field to enter any relevant information on the control test in question.
Click on the Start button to stat the test execution.
|
3.
|
In this step, the samples of the test in question will be evaluated. There are two statuses for executing control tests:
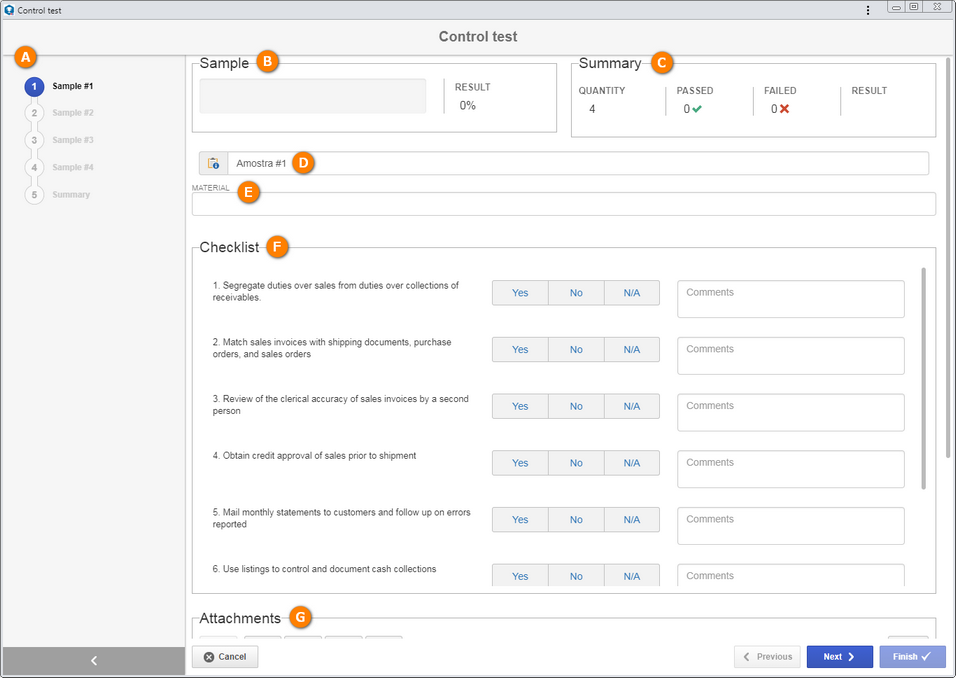
In the example below, the control test has a checklist associated with the test plan of which it is a part. In this case, the questions on this checklist will be used as a requirement for sample evaluation. Check the available options on this screen:

(A)
|
This panel has the number of samples defined in the control test record to be analyzed in the test. The last step will have the Summary of the test result.
|
(B)
|
The Sample section will display the evaluation result of the sample in question.
|
(C)
|
The Summary section will display a summary of the main information of the test, such as the number of samples to be analyzed, the result (passed or failed) of samples that have already been analyzed, as well as general test result.
|
(D)
|
This field displays the title of the sample in question, and it is possible to edit it.
|
(E)
|
If during the test plan configuration, in the "Sample attributes" section, attributes have been associated, they will be displayed during the test execution, making it possible for them to be identified by their names. In that case, enter their values. Those that are required must have their values filled out. The blocked attributes will be filled by the system according to the default value set when associating it with the plan type. Remember that the way to enter an attribute value varies according to the configurations set when creating its record.
|
(F)
|
The Checklist section will only be displayed if a checklist is associated in the test plan of the test in question. In this case, evaluate the test with the questions from this checklist. Each question may be answered with YES, if it meets the requirements of the question, or NO, if it does not. Questions that have been answered as N/A will not be considered in the test sample result calculations. In the Comments field, add comments on this particular question.
|
(G)
|
In the Attachments section, add, if necessary, attachments related to the test being executed. Refer to the Adding attachments section for further details on how to add attachments.
|
|
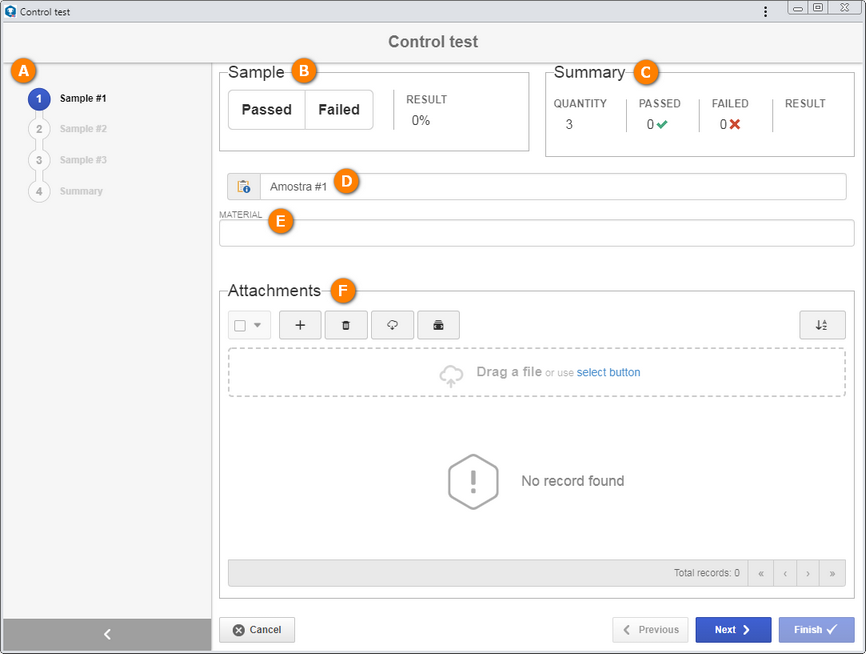
 In the example below, the control test does NOT have a checklist associated with the test plan of which it is a part: In the example below, the control test does NOT have a checklist associated with the test plan of which it is a part:

(A)
|
This panel has the number of samples defined in the control test record, and the last step will have the Summary of the test result.
|
(B)
|
The Sample section will be used to evaluate the samples. To do that, click on the Passed button to approve the sample being evaluated or click on the Failed button to reject it.
|
(C)
|
The Summary section will display a summary of the main information of the test, such as the number of samples to be analyzed, the result (passed or failed) of samples that have already been analyzed, as well as general test result.
|
(D)
|
This field displays the title of the sample in question, and it is possible to edit it.
|
(E)
|
If during the test plan configuration, in the "Sample attributes" section, attributes have been associated, they will be displayed during the test execution, making it possible for them to be identified by their names. In that case, enter their values. Those that are required must have their values filled out. The blocked attributes will be filled by the system according to the default value set when associating it with the plan type. Remember that the way to enter an attribute value varies according to the configurations set when creating its record.
|
(F)
|
In the Attachments section, add, if necessary, attachments related to the test being executed. Refer to the Adding attachments section for further details on how to add attachments.
|
|
After evaluating the sample, click on the Next button to proceed to the next sample being evaluated. If you wish to return a step, click on the Previous button.
|
4.
|
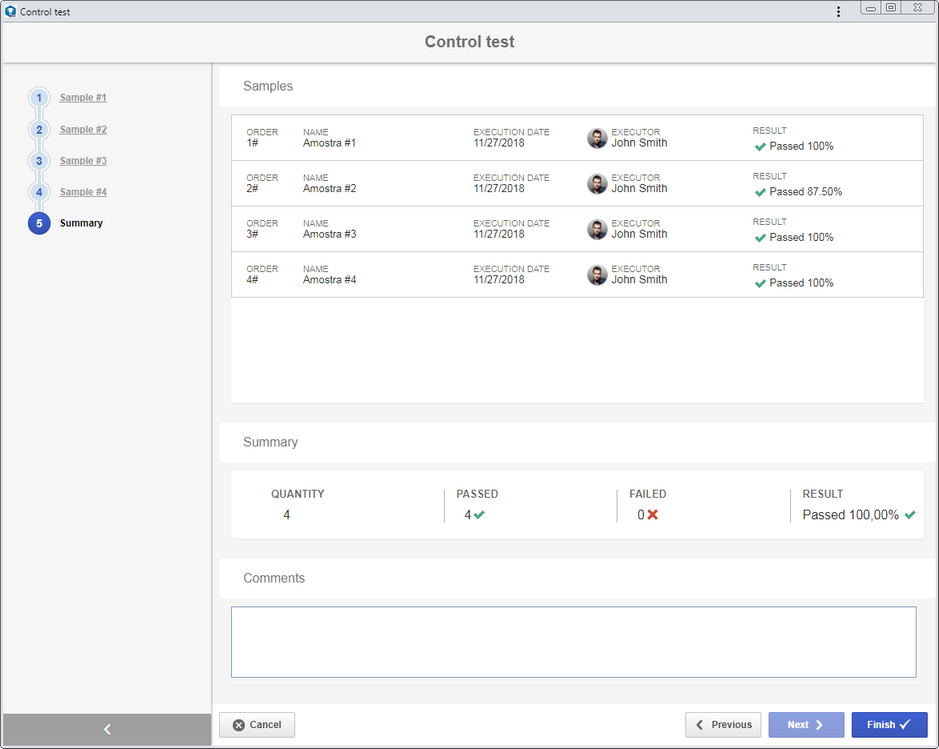
After evaluating all samples, the test Summary will be displayed in the control test screen. This summary will have the results of the evaluations of each sample, as well as the general test result.

Comments: Use this field to describe comments about the test. If it is configured as required, this field must be mandatorily filled out.
The test result will be Passed if the sample approval percentage is bigger or equal to what was determined in the test plan of the control test in question. If not, the result will be Failed.
|
5.
|
Click on the Finish button to finish the control test execution. at this point, those responsible for the test will receive the Control test approval task.
|
|


