|
To add a calendar, click on the  button on the main screen toolbar. To edit a calendar, select it in the main screen hierarchy and click on the button on the main screen toolbar. To edit a calendar, select it in the main screen hierarchy and click on the  button. button.
On the screen that will be opened, enter an ID # and a name for the calendar. Fill out the Calendar field for the type to be hierarchically added below another calendar. In this case, select the desired calendar. By default, the fields on the sub-calendar data screen will be filled with the information entered in the upper level calendar, but it is possible to edit them. If a calendar is selected in the main screen hierarchy, this field will be filled out by the system, but it will be possible to edit it.
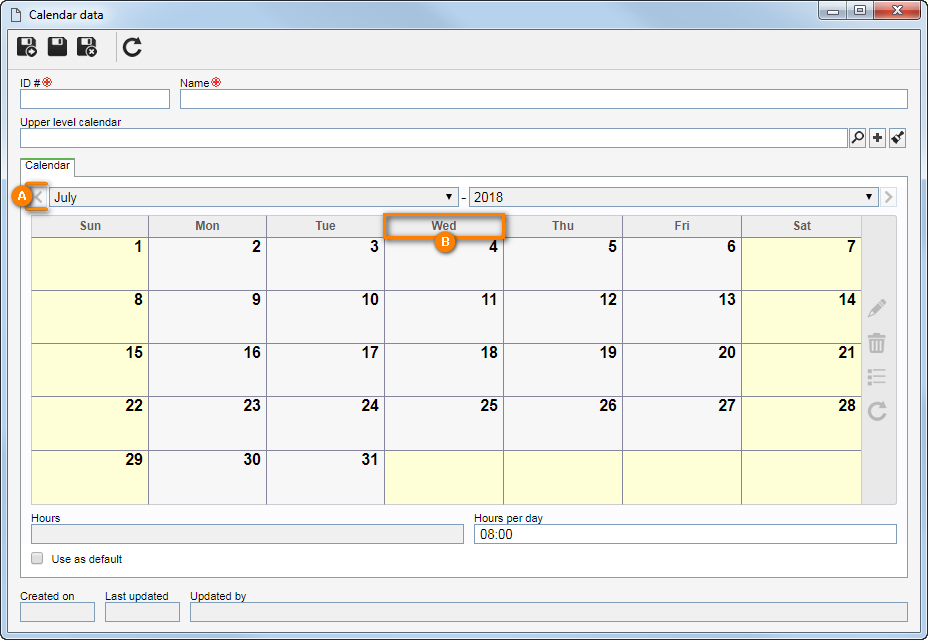
After saving the record for the first time, the Calendar tab will be enabled. Use the filters at the top of the tab (A) to navigate to the desired month and year. The calendar right below that will display the days of the selected period. On the side toolbar, the following buttons are available:
|
Click on this button to configure an exception in the calendar. This button will only be enabled when selecting a specific day or a set of days in the calendar (B). See how to perform this operation in the Configuring an exception section below.
|

|
Click on this button to delete the exception (non-working day) configured for the day selected in the calendar.
|
At the bottom of the tab, the following fields are displayed:
Field
|
|
Hours
|
Displays the hours configured for the day selected in the calendar.
|
Hours per day
|
Fill out this field with hours that equate to 1 day of work. For example: 1 day means 08:00 worked hours. The hours entered in this field will be used for the management and control of resources in SE Suite.
|
Option
|
Checked
|
Unchecked
|
Use as default
|
The calendar will be considered and used as default for SE Suite.
|
The calendar will not be considered the default, but it will be available to be associated with SE Suite records.
|
After performing the necessary configurations in the calendar, save the record.
Configuring an exception
|
In the Calendar tab, it is possible to configure exceptions in the work period. To do that, browse to the desired month and year:
▪If you wish to set a specific day select the day on the calendar. ▪To set an exception for a weekday for all months of the year, click on the name of the weekday. For example: By clicking on "Wed", every Wednesday of the year will be selected, and the configuration will be applied. Once done, click on the button on the side toolbar and fill out the following fields of the screen that will open:
Period
|
|
Start date
|
This field is automatically filled out by the system with the day selected in the calendar.
|
End date
|
Select the date until which the configuration will be valid. For example, when configuring an exception for non-working days, enter the date in which the exception ends.
|
Exception type
|
|
Working day
|
Select this option for the day to be configured as a working day. In that case, the following options are available:
▪Time period: Select this option to set a range of hours that covers the work period. Click on this button to add lines for time periods. Once this is done, double-click on the added line and enter the start and end times for the exception. Repeat the procedure to add as many time periods as necessary. ▪Total time: Select this option to set a number of working hours for the exception. In the field that will be enabled, enter the total hours you wish. |
Non-working day
|
Select this option for the day to be configured as a non-working day. In the Description field that will be displayed, enter why this day is an exception.
|
Save the record after filling out the fields.
|
|