|
This section describes the steps on how to create batches manually. If the batches are created by the system, by hot folder or email monitoring, they will be presented in the list of records, and it is possible to edit its data according to the parameterizations established in the configuration of the capture.
To add a new batch, click on the  button on the main screen toolbar. button on the main screen toolbar.
On the screen that will be displayed, select the capture configuration that will be used to create a batch and save the selection made. Only the capture configurations to which logged user has the "List" control allowed in their security will be available for selection.
The way the batch screen will be opened will depend on the configurations performed in the general parameters and whether it is the first access. Refer to Executing external applications for further details.
On the batch screen, the ID # is filled out by the system with the sequential number and the name is filled out with the date and time of the batch creation; however, it is possible to edit the information. In that case, enter the desired ID # and name for the batch.
Importing files to the batch
First, it is necessary to import the files that will make up the batch being created. It can be performed in the following ways through the Captures panel:
1.Drag the desired files and drop them in the indicated area or use the respective links to select and scan the files.
2.Use the Upload file option to import scanned files and documents from the local machine. On the screen that will open, locate and select the desired files and save the selection made.
3.Use the Scanning option to scan the desired documents. To do this, it is necessary to have a scanner with TWAIN standard support installed. If in the capture configuration applied to the batch, the "Allow user to choose scanning profile" option is checked, when adding this options, the system will display a screen that will allow changing the scanning profile that will be used. This option will not be displayed if the document type of the capture configuration is "XML".
▪Notice that the files that may be imported will vary according to the "Document type" set in the capture configuration. For example, if it is set that the document type will be XML, it will not be possible to import .pdf files. ▪If the capture configuration document type is "Image", when importing a .pdf file, it will be converted to .tif. ▪If the "Break multipage file" option is checked in the capture configuration, the system will break the imported file into many files. If the document type of the capture configuration is "Any type" and the imported file is a pdf, the file will be broken into many pdfs. If the document type is "Image" and the image file is a pdf, the file will be broken into many .tif files. |
Sort files in documents
The imported files will be displayed according to the following example. The grouping of the files will vary depending on the batch type set in the capture configuration:

Multiple documents
|
The files will be displayed grouped in the "Loose files - Will comply the batch rules" option. In that case, it is possible to create the documents which the files will be associated with. See more details in the Document separation section.
|
Single document
|
The files will be displayed already associated with a document, and it will not be possible to create new documents. In this case, the files will be displayed grouped in the "No title" section.
To define a title for the grouper (document), click on the "Edit" icon and fill out the following fields:
|
ID #
|
Enter a number or code to identify the document.
|
Title
|
Enter a name for the document.
|
Category
|
If the "Dynamic category selection" option is checked in the capture configuration, click on this field to change the categories that will classify the document created from a batch.
If this option is not checked, the document will be created in the category defined in the capture configuration.
|
If in the Processing section of the capture configuration it was set that the ID # and/or title will be filled in from an index or relationship variable, this procedure will occur when executing the "Relationship" step.
In case these fields are filled out in the Capture step, the data entered will be overwritten with the values set in the "Processing" section.
|
The upper part of the grouper displays the total number of pages of the document this grouper represents, whereas the lower part displays the total pages of the batch.
|
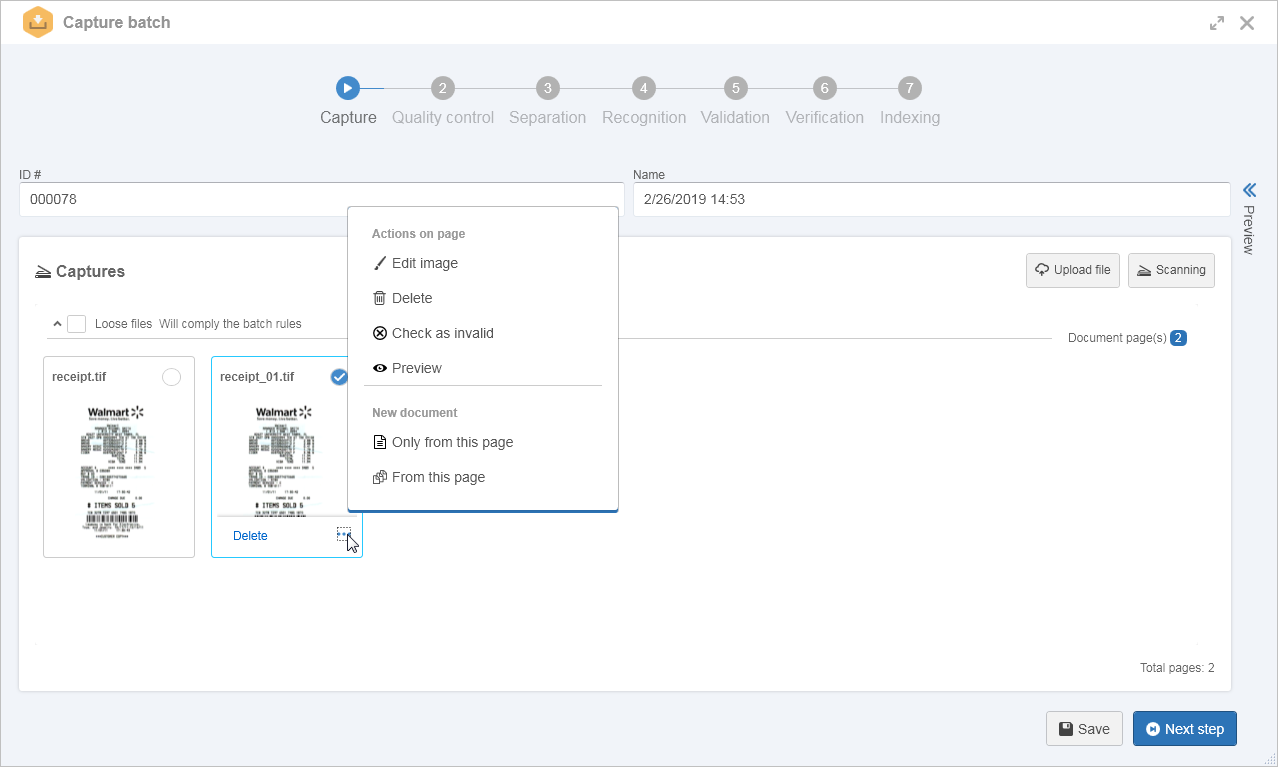
Actions on page
When selecting a file in the Captures panel, an option that allows its deletion is displayed, regardless of whether it is a multiple or single document batch. When clicking on the  option, the following options may be displayed: option, the following options may be displayed:
Page actions
|
|
Edit image
|
This option will only be available if the imported file is an image. Clicking on it will open a screen with the options that will allow enhancing the image. See a detailed description of these options in the Editing an image topic.
|
Delete
|
Allows deleting the selected file.
|
Check as invalid
|
Defines the file as an invalid page.
|
Check as valid
|
This option will only be available if the selected file was checked as "Invalid". In this case, use it to make the file valid again.
|
Unmark page as blank
|
This option will only be displayed if the file is detected with a blank page by the system. Select it to indicate that the file is not related to a blank page. The blank page detection is configured in the Capture section of the capture configuration.
|
Preview
|
Select this option so that the preview panel is expanded, which allows viewing the selected file. The file can only be successfully previewed if it is an image (tif, tiff, gif, png, jpg, jpeg and bmp) or a pdf.
The preview panel may be expanded and hidden from the option displayed on the right side of the screen. See further details on the Preview panel topic below.
|
If the batch type is "Multiple documents", the options for the creation of a new document with which the new file will be associated will be displayed. See more details in the Separating documents section.
|
Preview panel
On the right side of the screen, there is an option that allows expanding and hiding the Preview panel. If the file is an image (tif, tiff, gif, png, jpg, jpeg and bmp) or a pdf, it will be possible to view its content. It is also possible to view the indexes configured in the recognition profile associated with the capture configuration of the batch.
To adjust the file view in the preview panel, use the following buttons:

|
Click on this button to increase the size of the imported image view.
|

|
Click on this button to decrease the size of the view of the imported image.
|

|
Click on this button to adjust the size of the view of the imported image to the preview panel.
|

|
Click on this button to rotate the image 90 degrees clockwise.
|

|
Click on this button to rotate the image 90 degrees counterclockwise.
|
The Edit image option will only be enabled in the Preview panel if the imported file is an image. Clicking on it will open a screen with the options that will allow enhancing the image. See a detailed description of these options in the Editing an image topic.
Save batch and send it to the next step
The following buttons are available in the lower part of the screen:
Buttons
|
Save
|
Saves the adjustments and changes made in the batch.
|
Next step
|
Sends the batch to the next configured step. Refer to the Executing a capture step section for more information about the capture steps for which the batch may go through.
|
|