|
See below how to configure a document transmittal form:
1.Access the Configuration  Document transmittal form menu. Document transmittal form menu.
2.To add a new transmittal form type, click on the  button on the main screen toolbar. To edit the data of a type, select it in the main screen hierarchy and click on the button on the main screen toolbar. To edit the data of a type, select it in the main screen hierarchy and click on the  button. button.
3.On the screen that will be opened, enter an ID # and a name for the transmittal form type.
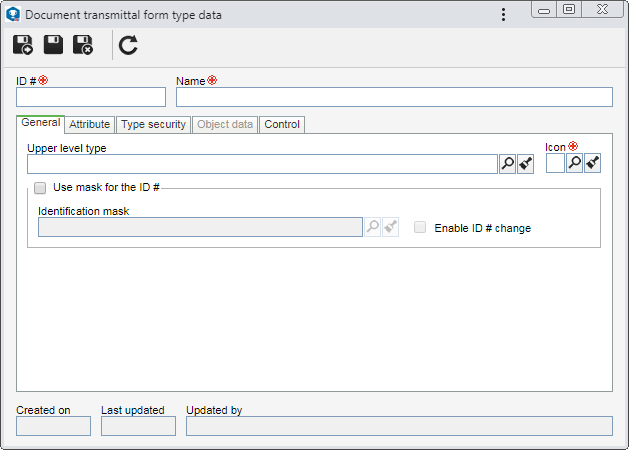
4.Done this, save the record. The following tabs will be available to be configured: General
Field
|
|
Upper level type
|
Fill out this field for the transmittal form type to be hierarchically added below another type. In this case, select the desired transmittal form type. If a type is selected in the main screen hierarchy, this field will be filled out by the system, but it will be possible to edit it.
|
Icon
|
Select the image that will represent the transmittal form type on the screens in which the resource is used.
|
Option
|
Checked
|
Unchecked
|
Use mask for the ID #
|
When adding transmittal forms to this type, the automatic identification resource will be used. The following fields will be enabled:
▪Identification mask: Select the desired identification mask. ▪Enable ID # change: Check this option to allow the generated ID # to be manually edited at the time of the inclusion of the transmittal form to this type. If it is not checked, the generated ID # may not be edited. |
The ID #s must be manually entered by the user who is adding the transmittal form to this type.
|
Attribute
Use this tab to define attributes to complement the information of the transmittal forms of this type. If the attribute configurations are edited (for example: an attribute checked as required becomes non-required or vice versa), these will be replicated to the document transmittal form type, when its data is changed. On the side toolbar, the following buttons are available:

|
Click on this button to associate an attribute that was previously created in the system with the transmittal form type. Refer to the Adding attributes section for further details on how to perform this operation.
|

|
Click on this button to save the association of attributes with the transmittal form type.
|

|
Click on this button to disassociate the attribute selected in the list of records from the type.
|
Type security
In this tab, the user configures the security, i.e., establishing who will be able to access the document transmittal form types and the operations that the specific users will be able to perform or not. To do that, first, select one of the following security options:
▪Public: Any SE Document user will have access to the type. ▪Restricted: Only certain SE Document users will have access to the type. At this point, the sidebar buttons will be enabled. Use them to add, edit, and delete accesses from the security list.
To add a new access to the security of the type, click on the button and perform the following steps on the screen that will be opened:
1.Select one of the following options to set the access type that will make up the security list:
Access type
|
|
Team
|
It will be composed of the members of a team already registered in SE Document.
|
Organizational unit
|
It will consist of users of a particular business unit/department of the organization.
|
Department/Position
|
It will be composed of users from a specific department of the company, who have a specific position.
|
Position
|
It will be composed of users who hold a specific position in the company.
|
User
|
It will be composed of a specific user.
|
All
|
It will be composed of all users who have access to SE Document.
|
2.According to the selected access type, the Search filters will be enabled to be filled out. Use them to make it easier to search for desired records.
3.If the selected access type is Organizational unit, the hierarchy of business units and the departments belonging to them (if any) will be displayed. Check the business units and/or desired departments. By checking the "Consider sublevels" option at the bottom of the screen, the system will also consider the organizational units that are down in the hierarchy of the selected organizational unit. Note that by checking this option, if new organizational subunits (whether they are business units or departments) are subsequently added, they will be automatically added to the security list.
Next to the hierarchy, the system also makes available buttons that allow you to check all the sub-levels of a particular organizational unit or uncheck all sub-levels. Note that by using the "Check all sub-levels" button if new organizational sub-levels are subsequently added, they will not be included in the security list.
4. Then, click on the Then, click on the  button on the toolbar of the selection screen. Depending on the access type selected and the values entered in the filters, the result will be displayed in the list of records, located at the bottom of the screen. Select the ones that will compose the security list. Hold the SHIFT or CTRL keys down or check next to each item, to select more than a record at a time. button on the toolbar of the selection screen. Depending on the access type selected and the values entered in the filters, the result will be displayed in the list of records, located at the bottom of the screen. Select the ones that will compose the security list. Hold the SHIFT or CTRL keys down or check next to each item, to select more than a record at a time.
5.In the Controls field, expand the list and check the desired actions. Then, define if they will be allowed or denied for the access type:
Control
|
Allowed
|
Denied
|
Add
|
The user will be able to add new transmittal form types in the levels below the type.
|
The user will not be able to add subtypes to the type in question.
|
Edit
|
The user will be able to edit the transmittal form type data.
|
The user will not be able to edit the transmittal form type data.
|
Delete
|
The user will be able to delete the transmittal form type.
|
The user will not be able to delete the transmittal form type.
|
Security data
|
The user will be able to edit the configurations performed in the "Security" tab of the transmittal form type.
|
The user may edit the other data in the transmittal form type, but the "Security" tab will remain blocked.
|
List
|
The transmittal form type will be displayed for the user on the system screens to which it is applied.
|
The transmittal form type will be displayed for the user on the system screens to which it is applied.
|
View
|
The user may view the transmittal form type data screen in "read-only" mode.
|
The user will not be able to view the transmittal form type data.
|
▪The controls that are not checked for a certain access type will be considered "denied". ▪Use the other buttons next to the field to select all available controls and clear the checked options. |
6.Done this, save the record.
Object data
In this tab, it is possible to configure the metadata that will be displayed in columns form in the Details tab Object section, of the data screen of the document transmittal form type. By default, some system-configured metadata are displayed in the list of records and cannot be deleted. On the side toolbar, the following buttons are available:
|
Click on this button to add a metadata to the transmittal form type. See further details in the "Adding a metadata" topic below.
|
|
Click this button to edit the selected metadata in the list of records.
|

|
Click on this button to delete the metadata selected in the list of records from the transmittal form type.
|

|
Click on this button to move the metadata selected in the list of records, up.
|

|
Click on this button to move the metadata selected in the list of records, down.
|
Adding a metadata
To add a metadata to the transmittal form type, click on the button on the main screen toolbar. On the screen that will be displayed, configure the following fields:
Object data
|
Field type
|
Select the metadata that will appear in column form:
▪Document property: The column shown on the document transmittal form will be a document property of SE Document. ▪Attribute: The column displayed in the document transmittal form will be an attribute of SE Document. ▪Transmittal property: The column displayed in the transmittal form will be a transmittal property. |
Field
|
The options available for selection will vary according to the previously selected "Field type":
|
Document property:
▪Category: The column will display the category of each document associated with the document transmittal form. ▪ID #: The column will display the ID # of each document associated with the document transmittal form. ▪Title: The column will display the title of each document associated with the document transmittal form. ▪Revision: The column will display the revision ID # of each document associated with the document transmittal form. ▪Date: The column will display the revision date of each document associated with the document transmittal form. ▪Status: The column will display the current status of each document associated with the document transmittal form. |
Transmittal property
▪Deadline: The column will display the return deadline of each document associated with the document transmittal form. ▪Return date: The column will show the date on which each document associated with the document transmittal form was returned to the sender. ▪Return transmittal: The column will display the name of the tab used to return to the sender each document associated with the document transmittal form. |
Attribute
|
This field will only be available if the previously selected field type is "Attribute". In this case, select the attribute that must be displayed as a column.
|
Sequence
|
Enter the display order to be followed in the column being configured on the data screen of document transmittal form.
|
Done this, save the record. Repeat the procedure to add all desired metadata.
Control
On this tab, it is possible to define specific controls for the document transmittal forms that will be registered in this type. To do that, the following fields are available:
Deadline for objects return (default)
|
Enter the number of days that a document, which has a return control on its sending reason, has as a deadline to return to the sender. The number of days entered in this field will be added, by the system, to the date of issue of the document transmittal form, resulting in the return deadline.
|
Movement mode
|
Internal
|
The transmittal forms will be used only inside the organization. In the Destination department field that will be enabled, select the department (SE Administration) that will be used as sender/addressee in the document transmittal form type. Use the other buttons next to the field to register a new department and use it as default department, fill out the field with the logged user department or clear the field.
Refer to the SE Administration component specific documentation for more information about departments and organizational units.
|
External
|
Transmittal forms will be used only to send documents to another company or organization. In the Default company field that will be enabled, select the default company (SE Administration) that will be used as sender/addressee in the document transmittal form type.
Refer to the SE Administration component specific documentation for more information about creating companies.
|
Both
|
Transmittal forms will be used within the company and to send documents to another company or organization. This will be defined during the registration. Both the Default area field and the Default company field will be enabled and the way to fill out the fields has already been described in the previous options.
|
Event type
|
Input
|
The transmittal forms will only be document inputs. In the Input checklist field, select the checklist that will be answered at the moment of the transmittal form issuance. Use the other buttons next to the field to add a new checklist and define it as input checklist or clear the field.
|
Output
|
The transmittal forms will only be document outputs. In the Output checklist field, select the checklist that should be answered at the moment of the transmittal form issuance. Use the other buttons next to the field to add a new checklist and define it as output checklist or clear the field.
|
Both
|
Transmittal forms will be used as document input and output, that is, the event type will be defined during its creation. Both the Input checklist field and the Output checklist field will become enabled and the way to perform its filling has already been described in the previous options.
|
After performing the necessary configurations, save the record.
|