|
See how to create a new document without the help of the wizard:
1.On the main screen toolbar, click on the arrow next to the  button and click on the Add new document option. button and click on the Add new document option.
2.On the screen that opens, select the category which will classify the document being created and save the selection.
3.At this point, the data screen of the document will be opened:
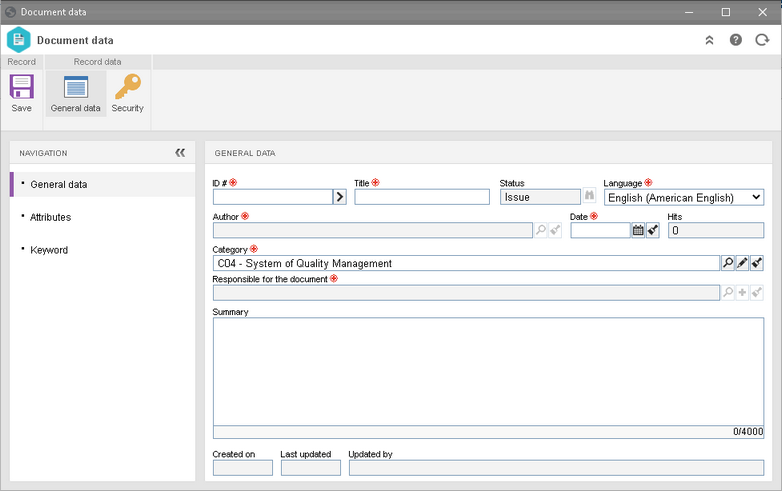
4.In the General data section, the following fields are available:
Fields
|
ID #
|
Enter a number or code to identify the document or use the arrow next to this field to generate an automatic ID #. If the ID # is not filled out, the system automatically generates one for the created document.
If the identification mask use has been configured in the category, when the automatic ID # is generated, the corresponding mask will be displayed. The ID # generated through the mask can only be edited if the "Enable generated ID # change" option is checked on the category data screen.
It will only be possible to use the same document ID # in different categories if the corresponding option is checked in the Document tab of the general parameters.
|
Title
|
Enter a name/title for the document or, if the use of identification mask for the title has been configured in the category, use the arrow located next to this field to automatically generate the title.
The title generated through the mask can only be edited if the "Enable title change" option is checked on the data screen of the category.
|
Status
|
Displays the current status of the document. If in the category, indexing or revision control has not been configured, the initial status of the document will be "Released".
|
Language
|
Select the language of the electronic files of the document. Thus, it will be possible to link the same documents in different languages, allowing the user to associate them and revise them together, when necessary.
|
Author
|
Displays the data of the logged user, and it is possible to edit it. In this case, enter the name of the person who wrote the document and it does not need to be necessarily, a user of the system.
If the author is also a system user, use the button placed on the side of the field, to select the desired user.
If in the document category the "Enable author name editing" option is not checked, after the record is saved for the first time, the author cannot be edited.
|
Revision*
|
If the revision ID # has been defined to be "Numeric" or "Text", this field will display the number/letter that corresponds to the current revision of the document. If the revision ID # is "Customized", enter an ID # for the document revision.
If it is the first revision and the "Enable ID # changes of revisions in the draft step" option is checked, the user can edit this field.
|
Date
|
Enter the validity date of the document/revision. When this field is filled out, it is important to consider:
▪If the document has the Revision control enabled in its category: This field will only be enabled for completion of the "Disable creation of released documents in the system" option is not checked in the category, and it should be filled out in documents that have already gone through draft step and the user wishes to release, because in this case, the system will cancel the revision flow and release the document on the entered date. Thus, if the entered date is before or equal to the current date, the system will change the document status to Released. If the entered date is after the current date, the system will ask to confirm the document should be published on the date that has been entered. If the user confirms publication, the system will keep the document status as "Issue" but its revision will remain under "Closure" until the date that has been entered, when it will be Released. Notice that if the "Disable creation of released documents in the system" option is checked on the category data screen, it will NOT be possible to fill out this field. ▪If the document has the Indexing control enabled in its category: Filling out this field is required and the date entered must be prior or equal to the current date. |
Hits
|
Displays the number of times the electronic file of the document was viewed.
|
Category
|
Displays the category selected during the addition, although it is possible to edit it. After a document is created, the user can transfer it to another category. To do this, simply select the button next to this field, the category to which you wish to transfer the document. Only the categories to which the user has the "Add" control enabled in the security will be available for selection.
|
Validity**
|
Displays the default time set in the validity configuration associated with the document category.
If in the validity configuration it is set that the default time will be Fixed, the values of these fields cannot be edited.
If it is set that it will be Variable and the default time field has not been filled out, enter the amount of time in days, months or years or the date by which the document will be considered valid. If the field has already been filled out, the user can edit the value.
|
Validity date**
|
Displays the date until which the document is valid according to the validity displayed/defined in the "Validity" field described above. On the displayed date, the Document due date task will be generated so that the revision/revalidation of the document is performed again.
|
Revalidation**
|
Displays the date on which the last document revalidation occurred. Therefore, this field will only be filled after this operation is performed in the document. Use the button located next to it to view the revalidation data performed.
|
Responsible for the document
|
Displays the data of the logged user, that is, of the user who is creating the document, and it can only be edited if the "Block record user editing" is not checked in the Security  Document section, in the Details tab of the document category. Document section, in the Details tab of the document category.
If the editing is unlocked, use the buttons located next to the field to select another user to be responsible for the document or to clear the filled-in field. It is important to note that editing this field will only be possible after saving the record for the first time.
|
Summary
|
Describe the document that is being created.
|
*It will only be displayed if the Revision control is set in the category that classifies the document.
**It will only be displayed if the Validity control is set in the category of the document being created.
5.The Attribute section will only be displayed if at least one attribute is associated in the Attribute tab on the category data screen. In that case, enter the values of the displayed attributes. Those that are required must mandatorily have their values filled out, while the blocked attributes will be filled out by the system with the default value defined when associating them with the document category. The way to fill out an attribute varies according to the configurations established during its registration.
6.In the Keyword section, it is possible to associate keywords related to the document subject. To do that, in the available field, type the keyword name and press Enter on the keyboard or use the  button and select the desired keyword. Associate all desired keywords. Use the other buttons next to the field to add a new keyword and associate it with the document. button and select the desired keyword. Associate all desired keywords. Use the other buttons next to the field to add a new keyword and associate it with the document. As the keywords are associated, they will be displayed in the area just below the field. To disassociate a keyword from the document, hover the mouse on the word and click on the Close option. To disassociate all document keywords, click on the  button, placed next to the Keyword field. button, placed next to the Keyword field.
7.After filling in all the necessary fields, save the record. At this point, all other sections and fields are available to be filled out. Refer to the Editing documents section for a detailed description of the other fields on the document data screen.
If the document has the Revision control enabled in its category, the system will ask the user if they wish to start a new revision. If so, the system will automatically create a revision for the document, according to the revision process configured for it:
▪ISO9000 based: Use the "Participant" section, to add, change or import the revision participants. ▪Workflow: The system will inform the workflow ID #. View the Revision process configuration section for more details on configuring and creating workflow revisions. In the Revision section, it is possible to view the revision data created for the document. |
|
