Configuring a digital signature |
|
|
To add a new digital signature configuration, click on the
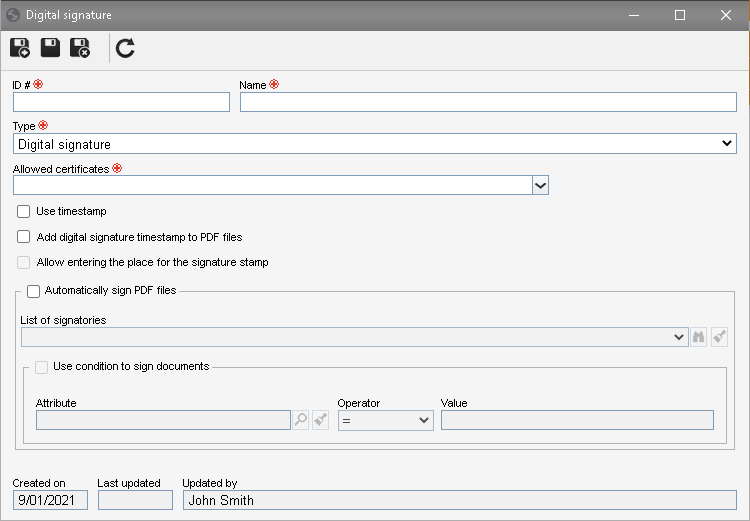
On the screen that will be opened, enter an ID # and a name for the digital signature configuration. Then, fill out the following fields according to the selected Type:
Digital signatureThe digital signature will be performed according to the previously made configurations for PDF, XML and CMS.
Enables signing electronic files of documents via DocuSign. To do that, first it is necessary to perform the necessary configurations on DocuSign in Admin mode. Fill out the following fields: ▪Integrator key: Paste the value of the Integration key field of the application created in DocuSign. ▪User ID #: Paste the value of the User ID field generated by DocuSign. ▪Private key: Paste the value of the Private key field generated by DocuSign. ▪Use demo environment: Check this option to use the demo environment to test the digital signature. If this option is not checked, the production environment will be used. ▪Allow entering the location for signatures and rubrics: The Edit in Docusign button will be displayed in the signature data. Thus, the DocuSign system will be opened to define the location for signatures and rubrics. See further details in the Electronic signature in documents - DocuSign section. ▪Webhook URL: Paste the URL in DocuSign in the process of configuring the signature to be used in the finishing. ▪DocuSign redirection URL: Copy the redirection URL and paste it in the DocuSign configuration after clicking on "Add URI".
Click on Grant DocuSign permissions. On the screen that will be opened, enter the DocuSign user and password and click on Allow.
Define the template type that will be applied: ▪Fixed: The same template will be used to sign all electronic files of the documents in this configuration, and it will not be possible to edit it when signing. In this case, in the Select a template field, associate the template that will be used for the digital signature. The available templates are those configured through the Template menu on DocuSign. Refer to the specific DocuSign documentation for a detailed description on how to create and configure templates. ▪Variable: Allows the template to be selected/edited when signing the electronic file. If a DocuSign template is associated in the Select a template field, it will be displayed during the signature, and it will be possible to edit it.
ClickSign integrationEnables signing electronic files of documents via ClickSign. For that, first it is necessary to perform the necessary configurations on ClickSign with a user that supports the API. Fill out the following fields: ▪Integrator key: Enter the integration key of the application created in ClickSign. ▪Use demo environment: Check this option to use the demo environment to test the digital signature. If this option is not checked, the demo environment will not be displayed. ▪HMAC SHA256 Secret: Enter the secret key provided by ClickSign. ▪Webhook URL: This field displays the URL that will be used by ClickSign when finishing the signature. ▪Send automatic reminder at every: Check this option for ClickSign to send a notification to signatories before they sign the document. On the field next to it, enter the interval of days for the notifications to be sent. Signature deadline: Enter the number of days the signatories will have to sign the electronic files of the documents in this configuration.
BRy integrationEnables signing electronic files of documents via BRy. For that, first it is necessary to perform the necessary configurations on BRy.
Fill out the following fields: ▪Client ID: Enter the Client_ID previously generated in BRy. ▪Client Secret: Enter the Client_Secret previously generated in BRy. ▪Allowed signature type: Check the signature types that will be allowed for the configuration in question. ▪Use demo environment: Check this option to use the demo environment to test the digital signature. If this option is not checked, the demo environment will not be displayed. ▪Add watermark: Check this option to add a watermark to the digital signatures of this configuration. Select, in the field next to it, the respective pages that must have the watermark. Signature deadline: Enter the number of days the signatories will have to sign the electronic files of the documents in this configuration.
Select one of the following digital certificates to be used in the digital signature of the configuration:
2 - Available only if the "Add digital signature timestamp to PDF files" option is checked. 3 - For this feature to work correctly, it is also necessary for the conversion of the files to PDF to be duly configured in the category.
List of signatories: Select the list of signatories with the certificates that will sign the electronic files of the documents in this category. Use the other buttons next to the field to view the data of the selected list of signatories and clear it.
GOV.BR integrationEnables signing electronic files of documents via GOV.BR. To do so, it is first necessary to be granted permission from the Digital Governance Department (Secretaria de Governança Digital - SGD) of the Ministry of Economy (Ministério da Economia - ME).
Then, fill out the following fields: ▪User ID #: Enter the ID # of the user that was entered along with the SGD permission granted via e-mail. ▪Client Secret: Enter the client secret that was entered along with the SGD permission granted via e-mail. ▪Use demo environment: Check this option for the system to use the GOV.BR system for the release, in which documents will not have the same validity as the production environment. When using a production environment, this option must be unchecked. ▪Add digital signature timestamp to PDF files: Check this option for a stamp with signatory data to be added to the last page of the document. A stamp will be added for each signatory.
After configuring the signature with the desired type, it must be associated with the categories of the documents to be signed with the integration type in question. |
|||||||||||||||||||||||||||