Adding items to the flowchart |
|
|
The Drag-n-Drop feature allows adding and positioning items in the flowchart. To add a new item to the flowchart with this feature, that is, drag the desired element from the Items panel to the flowchart. It is also possible to add elements by using the menu that is displayed when selecting a modeled item in the flowchart. See below how to add items to the flowchart:
Drag-n-DropTo add an item as the Drag-n-Drop feature, click on the item that will be included, in the Item panel, and drag it to the flowchart area. The item will be displayed in the flowchart, but it will be still required to connect it to the other flowchart items.
 Adding an activity with the Drag-and-drop feature
To make the connection between two flowchart items, it is also possible to use the connector options displayed on the Items panel. To do that, first click on the desired connector (in the items panel), click on the predecessor item, and then click on the second item. Refer to the Connecting flowchart items section for more details on how to make the connection between the flowchart items.
Menu of the selected itemAnother way to add items is to use the menu that appears when selecting a flowchart item. When selecting an item in the flowchart, a menu with the most common items appears, click on the desired. At this point, the item will be added to the flowchart that is connected to the previous item: In this menu, the system allows clicking or clicking and dragging the desired item: when you click, the new item is added immediately to the left of the item that was selected; when dragging, it is possible to set the location where this new item will be added.
 Adding an activity from the selected item menu
When adding a new item, it may be necessary to correct the alignment, in relation to the other items in the flowchart. To do this, click on the newly added item and drag it to the desired position, SE BPM will display horizontal or vertical lines when the item aligns with another flowchart item. These lines are also displayed when you add a new item by dragging one of the items displayed options when you select an element in the flowchart. For more details on aligning items, refer to the Aligning items in the flowchart section.
To add more items, the user must follow one of the previous steps: drag the item to the flowchart or select one of the options displayed after an item is selected in the flowchart. See in the following sections how to connect and how to align items that have been included in the flowchart.
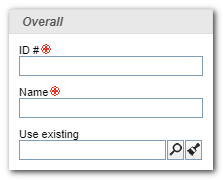
After dragging an activity to the flowchart area, it will be necessary to enter an ID # and a name for the activity before saving the flowchart. To do that, select the activity in the flowchart and fill out the ID # and Name fields in the General section of the Item panel. Filling out these fields in mandatory, but the system automatically defines a sequential value for the item ID # and name of the activity. If necessary, it is possible to edit the ID # and the Name of the activity after the flowchart has been saved, but this operation must be performed through the activity item data. To do that, select the item in the flowchart and click on the Data button of the Button panel.
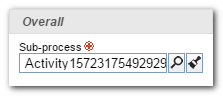
After dragging a sub-process item to the flowchart area, it will be necessary to select the process that will be defined as a sub-process in the flowchart. To do that, select the sub-process item in the flowchart and select the process in the Subprocess field in the General section of the Item panel. Filling out this field is mandatory; if no process is selected, a screen will be displayed with the "Inexistent sub-process" error when trying to save the flowchart. Next to the Sub-process field, the Add button is displayed, allowing the creation of a new process, selecting it as a sub-process of the flowchart being modeled. |