|
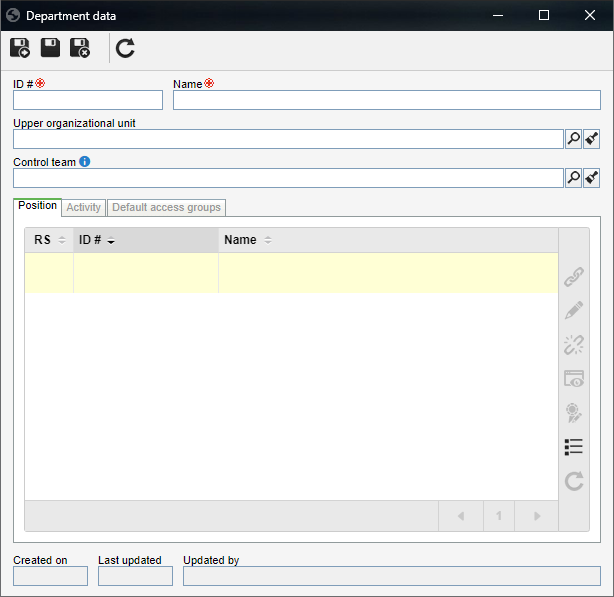
To add a new department, click on the arrow next to the  button and select the Department option. To edit the data of a department, select it in the main screen hierarchy and click on the button and select the Department option. To edit the data of a department, select it in the main screen hierarchy and click on the  button. button.
On the data screen that will open up, the following fields will be available:

Fields
|
|
ID #
|
Enter a number or code to identify the department.
|
Name
|
Enter a name for the department.
|
Upper organizational unit
|
Fill out this field for the department to be hierarchically added below another organizational unit. In this case, select the desired department or business unit. If an organizational unit is selected in the main screen hierarchy, this field will be filled out by the system, but it will be possible to edit it.
|
Control team
|
Fill out this field to define that the members of a certain team may view the records regarding users that belong to the department in the SE Administration, SE Competence and SE Training components, as long as they have access to the respective menus. The team set in this field complements the team set in the general parameters (if any).
If this field is not filled out and a control team is not defined in the general parameters either, the configurations performed in the "Allow logged user to view records from" field of the general parameters will be valid.
|
After saving the record for the first time, the following tabs will be available:
This tab displays the positions held by the users in that department. On the side toolbar, the following buttons are available:

|
Click on this button to associate a position with the department. On the screen that will be displayed, select the desired positions. Use the SHIFT or CTRL keys on the keyboard or check next to each record to select more than one position at a time.
|

|
Click on this button to view the relationship between the department and the position selected in the list of records. On the screen that will open, it is also possible to enter a description for the relationship.
|

|
Click on this button to disassociate the position selected in the list of records from the department.
|

|
Click on this button to view the data screen of the position selected in the list of records.
|

|
Click on this button to map the requirements needed to perform the position in question. See further details about the screen that will be displayed in the Organizational mapping - Interface section.
|
|
On this tab, it is possible to manage the activities that are under the responsibility of this department. On the side toolbar, the following buttons are available:

|
Click on this button to associate an activity with the department. On the screen that will be displayed, select the desired activities. Use the SHIFT or CTRL keys on the keyboard or check next to each activity to select more than one record at a time.
|

|
Click on this button to disassociate the activity selected in the list of records from the department.
|

|
Click on this button to view the data screen of the activity selected in the list of records.
|
|
Use this tab to view the access groups used by the positions held by the members of the department. The access group is configured in the SE Configuration component, through the Access group (CM011) menu. On the side toolbar, the following buttons are available:

|
Click on this button to associate an access group with a position from the department. On the screen that will be opened, first select the desired position in the respective field. Note that the positions associated in the Position tab are available for selection. After that, locate and select from the list of records at the bottom, the access group you wish to associate with the position. Once done, save your selection.
|

|
Click on this button to disassociate the access group selected in the list of records from the position and department.
|
|
After performing the necessary configurations, save the record.
|


