|
To verify containment/disposition, investigation, action plan or standardization actions of an occurrence, first, select it on the main screen list of records. After that, click on the  button on the toolbar. button on the toolbar.
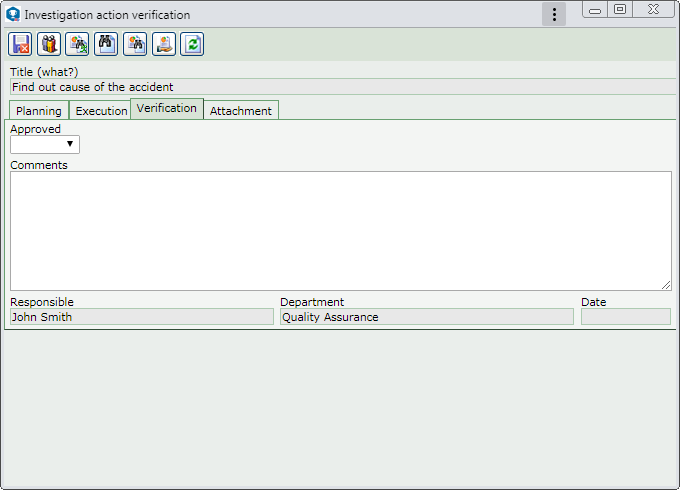
At this point, the system will display the action data screen. The Title field, the Planning tab and the Execution tab will be filled out with the data entered during the respective steps of the action. The following tabs are also available:
 This image refers to the verification of the implementation of an investigation action. The screen displayed in the verification of the actions of other treatment steps of the occurrence is similar.
General
|
Approved
|
Select the "Yes" option to approve or the "No" option to reject the action execution.
|
Comments
|
Enter comments regarding the approval/rejection of the action execution.
|
|
This tab will only be displayed if it is thus defined in the Information tab in the occurrence classification. Use it to manage the attachments related to the occurrence to which the action being verified belongs; however, it is possible to associate others. On the side toolbar, the following buttons are also available:

|
Click on this button to add an attachment to the action. See further details about this operation in the Add attachment topic below.
|

|
Click on this button to edit the attachment selected in the list of records.
|

|
Click on this button to delete the attachment selected from the list of records.
|

|
Click on this button to view the electronic file of the attachment selected in the list of records.
|
Add attachment
|
To add an attachment to the occurrence, click on the  button on the side toolbar. On the data screen that will be opened, fill out the following fields: button on the side toolbar. On the data screen that will be opened, fill out the following fields:
Attachment data
|
File
|
Click on the  button and, on the screen that will open, browse the directories and select the desired file. button and, on the screen that will open, browse the directories and select the desired file.
|
ID #
|
Displays a sequential number to identify the attachment, and it is possible to edit it. In that case, enter a number or code to identify the attachment.
|
Name
|
Displays the name of the previously selected file, and it is possible to edit it. In this case, enter a name for the attachment.
|
Type
|
Select the type that will classify the attachment. If a default attachment type has been set in the Configuration  Attachment type menu, this field will be filled out by the system with that type. Attachment type menu, this field will be filled out by the system with that type.
|
Date
|
Displays the date in which the action attachment is being added.
|
Comments
|
Enter important information about the attachment.
|
After that, save the record. Repeat the procedure to add all desired attachments.
|
|
After filling out all the necessary fields, save the record:
▪If the action verification is approved, the action is closed. ▪If the action verification is rejected, the record returns to the Execution step for the responsible parties to perform the necessary adjustments.
Use the toolbar buttons to view the occurrence process flow, issue a report with the action data, view the occurrence data, issue a report with the occurrence data and issue a customized report with the occurrence data.
|
|


