|
SE Process allows carrying out process simulations with the purpose of facilitating the identification of critical points and bottlenecks, besides allowing the evaluation of the process behavior with different costs, resources, among others. See an example on how to execute a process simulation:
See a quick and easy way of simulating processes in the "Simulate a process" topic of the SE Process Quick Guide!
|
1.
|
First of all, locate and open the process flowchart that will be simulated.
It is important to note that to run the simulation, the flowchart must be opened in edit mode, this way the "Edit process model" permission is required. If the process has revision control, then the simulation can only be executed during the revision.
|
|
2.
|
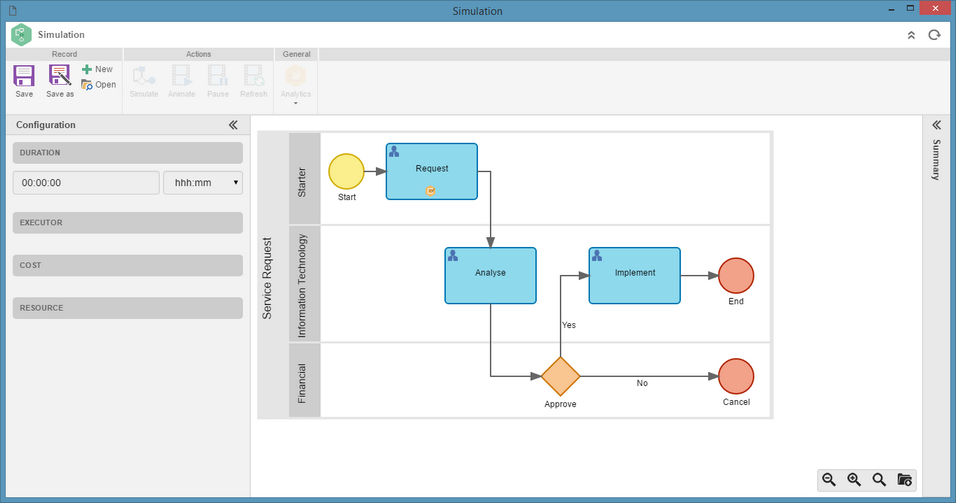
With the flowchart open, click on the Simulation button. At this point, the screen where the process simulation will be performed will be displayed:

|
3.
|
Select an activity or decision from the flowchart displayed on the simulation screen. At this point, the fields of the Configuration panel will be enabled, displaying the default information of the selected activity/decision. Enter the duration, executor, cost and resource that will be used in the activity/decision for the simulation. In case the activity/decision has two or more output flows, the "Output flow" section will display those flows with a certain percentage value. If you wish one of these flows to occur more often than the other, during the simulation, just increase the value of the percentage of the flow and cut the value of the others as needed.
In the simulation configuration, the settings of costs, resources, and executors for each activity are made. In that way, the configuration must be performed for each process flowchart activity/decision.
|
|
4.
|
After making and saving the configuration of all activities, it will be possible to save the configured scenario. Click on the Save or Save as button. If desired, configure as many scenarios as necessary.
|
5.
|
To run the simulation, click on the Simulate button. To run a simulation of a specific scenario, click on the Open button, select the desired scenario and then click on the Simulate button.
|
6.
|
At this point, the system will display a screen where the number of Instances that will be executed by the simulation should be defined. Enter also the Interval that there will be between the initializations of the instances and which will be the Route type:
▪Probabilistic |
In this route calculation, the execution will be determined by a draw, where the percentage defined for each output flow will be considered as a probability for an execution.
|
▪Deterministic |
In this route calculation, the system ensures that the percentage defined for each output flow is reached. For example, in 10 instances, the output flow configured with 80% will run 8 times.
|
Click on the Save button to run the simulation with the configured configurations.
|
7.
|
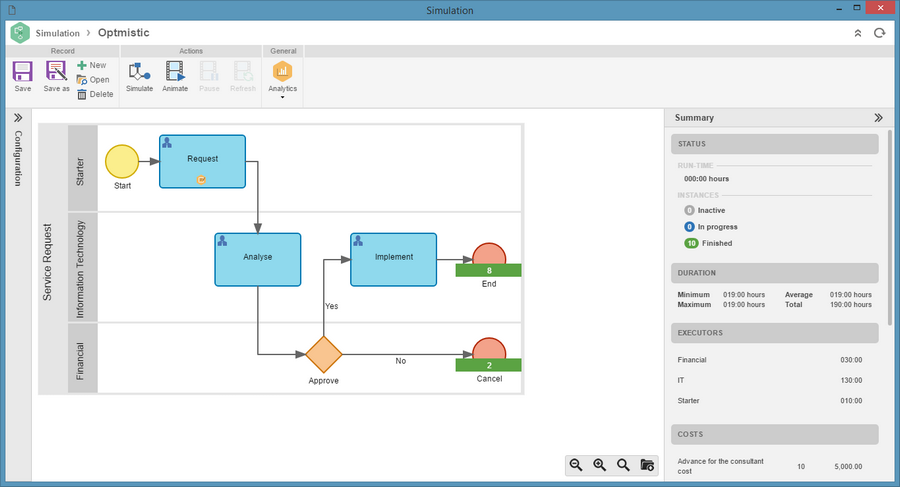
After the calculation, the result of the simulation will be displayed in the flowchart and on the Summary panel. At this point, it is possible to perform, by means of the Analytics button options, the result analysis obtained. It will also be possible to execute the simulation animation performed, where it is possible to visualize graphically the activities/decisions, in the flowchart, being enabled as the instances are being initialized.
|
8.
|
To start the simulation animation, click on the Animate button and, on the screen that will be displayed, enter the speed of the animation. Upon confirmation, the animation will start. At this moment, the Pause button which will allow pausing the animation, and the Refresh button which will allow restarting the animation, will be enabled. The Animate button will be enabled, allowing you to continue with the animation from where it has been paused, however, the animation configuration screen will be displayed again, so it can be possible to change the speed of the animation if necessary.
 Simulation animation with 10 instances |
|


