Adding a recurring task |
|
|
Recurring tasks are tasks that occur repeatedly during the development of the project. See how to add this type of task to the project structure:
1.In the structure, select the structure level (project or task) below which you wish to add a recurring task.
2.Click on the arrow below the Add
3.Fill out the following fields on the data screen that will be displayed:
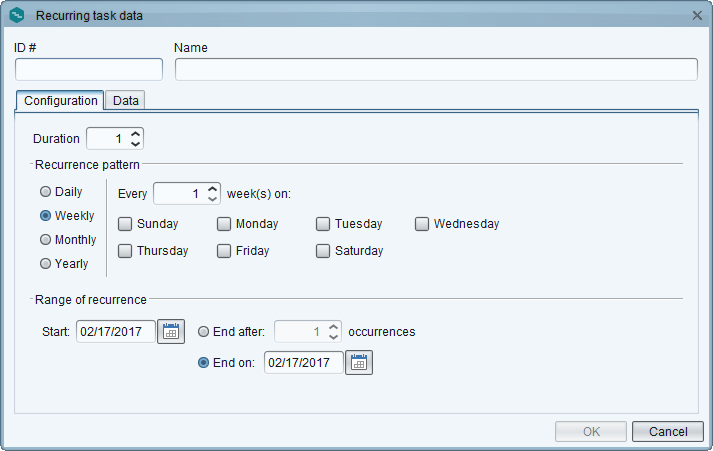
ID #: Enter a number or code to identify the recurring task. Name: Enter a name for the recurring task.
4.In the Configuration tab, the following fields are available: Duration: Enter, in days, the duration of each occurrence of the task. Recurrence pattern: Define how the occurrence frequency will happen. ▪Daily: The recurring task will occur every determined number of days. In the Every ___ field, enter the desired number of days and, then select whether this number refers only to working days or any day (non-working days in the project calendar will not be considered in the interval). For example: Every 2 days, every 5 days, etc. ▪Weekly: The recurring task will occur every determined number of week and on specific days. In the Every ___ week(s) on field, enter the number of desired weeks and then check the days of the week that correspond to the days on which the task will occur. For example: Every single week on Monday, Wednesday, and Friday. ▪Monthly: The recurring task will occur on a specific day of the month. For that, select one of the following options: oDay __ every __ month(months): Select this option for the recurring task to occur on a determined day every determined number of months. For example: Day 15 every 1 month. oThe ____ of each __ month(months): Select this option for the recurring task to occur on a determined day every determined number of months. For example: The last Wednesday of every 1 month. ▪Yearly: The recurring task will occur on a specific day of the year. To do that, select one of the following options: oOn ____: Select this option for the recurring task to occur on a specific date of the year. For example: On June 29th. oThe ____ of __: Select this option for the recurring task to occur on a determined day of the month in the year. For example: The last Wednesday in June. Range of recurrence: In this section, define the period during which the task recurrence will be applied. ▪Start: This field is filled by the system with the project start date, but it is possible to edit it. In this case, select the date from which the task recurrence will be valid. After that, use one of the following options to define when the recurrence will finish: ▪End after __ occurrences: Select this option and enter the number of occurrences after which the task recurrence will finish. ▪End on __: Select this option and enter a specific date on which the task recurrence will finish.
5.In the Data tab, fill in the following fields to configure the data of the recurrence task: Responsible: The User ID and Name fields will be filled in by the system with the respective information of the user responsible for the project; however, it is possible to edit them. In that case, select, in the respective fields, the user ID and name of the responsible user for the recurring task. Note that it will only be available for selection, system users who have access to SE Project. Team: Select the team that will be responsible for the task, i.e., the members of this team will have the same prerogatives as the responsible user. Type: This field will be filled by the system with the default task type set in the project to which the task belongs, but it is possible to edit it. In that case, select the type that will classify the recurring task. Note that, if the task type is edited, the configurations applied to it will also be edited, such as: attributes, calendars, execution approval route (if any) etc. Priority: This field is filled by the system with the default priority set in the Configuration Calendar: This field is filled by the system with the default calendar defined in the previously selected task type, but it is possible to edit it. In that case, select the calendar that will be applied to the recurring task. Pattern: Select the shape that will be used to represent the task bar in the Gantt chart. Color: Use the buttons next to this field to select the color that will be used to represent the task in the Gantt chart and to restore the task color to default established in the system. Cost classification: This option will only be displayed if the "Classify costs as Capital and Operational" option has been configured in the project data. Select one of the options to define the classification of the costs in the nonproject task: Unclassified, Operational (OPEX) or Capital (CAPEX). This classification will be displayed in the "Finance" section of the task.
The following options are also available:
6.After entering the necessary values, click on the OK option displayed at the bottom of the screen. At this point, the recurring task will be entered in the project structure. It can be identified in the S column by the
7.Use the Task data option to perform the required settings in the included recurring tasks. Refer to the Editing task data section for further information on how to perform this operation. |