Editing task data |
|
|
After inserting the tasks into the project structure, it is necessary to perform the necessary adjustments in its data. The data screen is the same for all task types, because of that, the description will be made in this section only. See how to perform this operation:
1.In the structure, select the task whose data you wish to edit.
2.Click on the Task data option on the Task tab.
3.Fill out the following fields on the data screen that will be displayed:
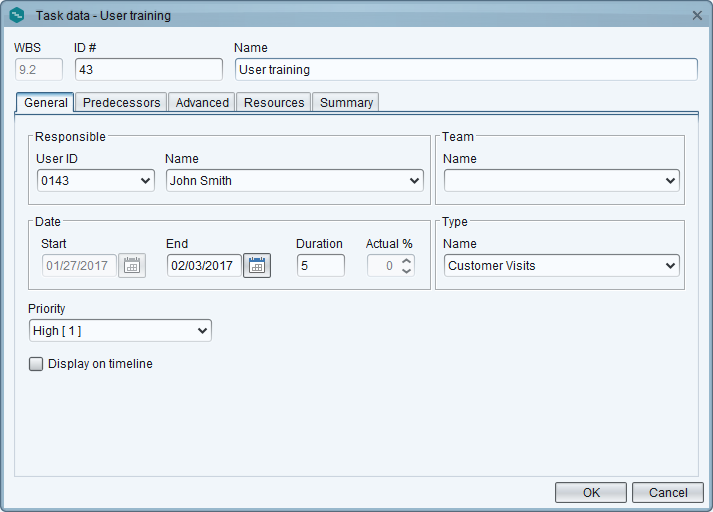
WBS: This field is filled in by the system with the position of the task in the analytical structure of the project. ID #: This field is filled in by the system with the sequential assigned to the task when inserting it into the structure. The ID # may only be edited if the Generate automatic identifier in the tasks option is not checked on the project data screen. In that case, enter a number or code to identify the task. Name: This field is filled by the system with the name assigned to the task when inserting it in the structure, but it is possible to edit it. In that case, enter a name for the task.
4.In the General tab, the following fields are available: Responsible: The User ID and Name fields will be filled in by the system with the respective information of the user responsible for the project; however, it is possible to edit them. In that case, select, in the respective fields, the user ID and name of the responsible user for the task. Note that it is only available for selection, system users who have access to SE Project. Team: Select the team that will be responsible for the task, i.e., the members of this team will have the same prerogatives as the responsible user. Date: Enter the following information: ▪Start: This field is filled in by the system with the date planned for the start of the task execution, taking into consideration its restriction type and link. If the restriction type of the task is Fixed date this field will be enabled for editing. In that case, select the start date of the task execution. ▪End: Select the date planned for the end of the task execution. ▪Duration: This field is filled in by the system with the number of estimated days for the task duration, according to its start and end dates; however, it is possible to edit it. If the duration is edited, the end date of the task will be recalculated according to the number of days entered. If this field is filled in with 0 (zero), the task will be considered a milestone. ▪Actual %: This field is filled by the system with the percentage of the execution. Type: This field is filled by the system with the default task type set in the project to which the task belongs, but it is possible to edit it. In that case, select the type that will classify the task. Note that, if the task type is edited, the configurations applied to it will also be edited, such as: attributes, calendars, execution approval route (if any) etc. Priority: This field is filled by the system with the default priority set in the Configuration Display on timeline: Check this option for the task in question to be displayed on the timeline of the project.
5.In the Predecessors tab, it is possible to establish the dependency links between the tasks. This link allows determining which tasks must be started or finished before the task in question. For that, fill in the fields on the following columns: WBS: Select the WBS of the task which the dependency link will be created in. The fields of the other columns will be filled in with the respective information of the selected task. ID #: Select the ID # of the task which the dependency link will be created in. The fields of the other columns will be filled in with the respective information of the selected task. Name: Select the name of the task which the dependency link will be created in. The fields of the other columns will be filled in with the respective information of the selected task. Type: Define how the link (dependency) between the task in question and the predecessor task will be created. For that, the following options are available:
Discrepancy: Enter the number of days/hours (according to the project time format) that will be considered as delay (lag) between the task in question and the predecessor task. This time is used when an interval between the end of the predecessor task and the start of the task in question is needed.
6.In the Advanced tab, fill in the following fields: Calendar: This field is filled by the system with the default calendar defined in the previously selected task type, but it is possible to edit it. In that case, select the calendar that will be applied to the recurring task. Restriction type: Define the restrictions that will be applied to the tasks regarding how the start and end dates will be limited. For that, select one of the following options: ▪As soon as possible: Schedules the task start for as soon as possible. When the project is configured for the scheduling to be performed from the start date, this option will be displayed selected by default when inserting a task in the project structure. ▪As late as possible: Schedules the task start for as late as possible, finishing before the end of the project and without delaying the predecessor tasks. When the project is configured for the scheduling to be performed from the end date, this option will be displayed selected by default when inserting a task in the project structure. ▪Start no earlier than: Schedules the task to start on or after a specific date. ▪Finish no earlier than: Schedules the task to finish on or after a specific date. ▪Start no later than: Schedules the task to start on or before a specific date. ▪Finish no later than: Schedules the task to finish on or before a specific date. ▪Must finish on: Schedules the task to finish on a specific date. ▪Must start on: Schedules the task to start on a specific date. ▪Fixed dates: The start and end of the task will be those specified by the user through the General tab. Restriction date: Select the date which the restriction type selected before will be valid for. This field will not be enabled if the restriction type selected before is "As soon as possible", "As late as possible", or "Fixed dates". Pattern: Select the shape that will be used to represent the task bar in the Gantt chart. Color: Use the buttons next to this field to select the color that will be used to represent the task in the Gantt chart and to restore the task color to default established in the system. Cost classification: This option will only be displayed if the "Classify costs as Capital and Operational" option has been configured in the project data. Select one of the options to define the classification of the costs in the nonproject task: Unclassified, Operational (OPEX) or Capital (CAPEX). This classification will be displayed in the "Finance" section of the task. APQP: This field will only be displayed if the automation with SE APQP has been configured in the type that classifies the project to which the task belongs. In it, select the APQP form that will be linked to the APQP activity that will be created from the project task in question. This operation can also be accomplished through the APQP column of the table area of SE GanttChart. Note that the APQP task created from the project task will have the same status in SE APQP as the project task in SE Project. Refer to the SE APQP/PPAP component specific documentation for more information on APQP forms.
7.The Resources will only be displayed if the time format of the project to which the task belongs is Hours. In it, it is possible to define the required effort so that the resources allocated can execute this task. Note that the allocated resources will be displayed in the list of records in the lower part of this tab. Fill in the following fields in the Allocation section: ▪Effort: Enter the number of hours needed to execute the task in question. ▪Remaining effort (RE): This field displays the remaining effort required to execute the task, according to Schedule option, configured in the project task to which it belongs. ▪Fixed effort: Check this field to make the effort of the task in question fixed. If this field is checked, the task duration will be calculated automatically, based on the number of hours entered for the effort, respecting the calendar of each resource.
8.On the Summary tab, the following fields are available: Description: Enter important information about the task. Explanation: Enter the purpose of the task. Objective: Enter the direction which the work in the task must be oriented to. Benefit: Enter the specific gains obtained from reaching the objective of the task. Assumption: Enter the propositions considered as true, actual, or certain to occur in the execution of the task. Restriction: Enter the limiting factors that will affect the execution of the task.
9.After entering the required values, click on the Following option displayed at the bottom of the screen.
|