|
To add a new indicator, click on the  button on the main screen toolbar. On the screen that will be displayed, select the type that will classify the indicator and save the selection. button on the main screen toolbar. On the screen that will be displayed, select the type that will classify the indicator and save the selection.
To edit the data of an indicator, select it in the list of records and click on the  button. button.
The following fields and tabs are available in the indicator data screen:
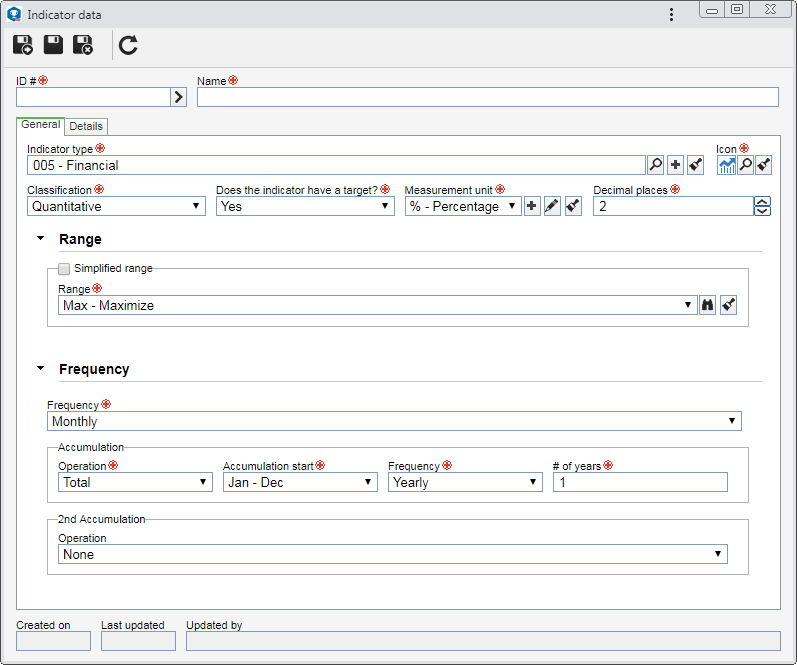
Field
|
ID #
|
Enter a number or code to identify the indicator or use the arrow next to this field to generate an automatic ID #. If the use of an identification mask was configured in the type, at the moment of generating the automatic ID #, the respective mask will be shown. The ID # generated through the mask can only be edited if the "Enable ID # change" option is checked on the data screen of the indicator type.
|
Name
|
Enter a name for the indicator.
|
Note: To successfully add an indicator, it is necessary to fill out the required fields in the General tab. After that, the sections in the Details tab will be available to be filled out.
Field
|
Indicator type
|
Displays the type selected during the addition of the indicator, although it is possible to edit it. In that case, select the type that will classify the indicator in question. Use the other buttons to add a new type to classify the indicator and clear the field.
|
Icon
|
Select the image that will represent the indicator.
|
Classification
|
Set whether the indicator will be:
▪Qualitative: The target and measurement of the indicator will be by concept. For example, in a "Customer service level" indicator, the target will be "great", while the measurements may be "Bad", "Regular" and "Great". It is important to note that, in order for the cumulative calculation of a qualitative indicator to be performed correctly, it is necessary for the score of the range items associated with it to be between the ranges configured in the Gauge tab of your data screen. It will not be possible to associate a simplified range. ▪Quantitative: The target/measurement values of the indicator will be numeric, that is, measurable. ▪Quantitative (HH:MM:SS): The target/measurement values will be measurable, but entered as hours, minutes and/or seconds. |
Does the indicator have a target?
|
Select the desired option:
▪Yes: The indicator will have a target. ▪No: The indicator will not have a target. In this case, the indicator will only have measurements, that is, it will not have its score calculated, being only informative. |
Measurement unit
|
Select the unit of measurement that will be used to inform the values of the indicator. This field will be disabled if the defined classification is "Qualitative".
|
Decimal places
|
Enter the number of decimal places that will be used for the indicator values. The number must be between 0 and 8. This field will only be enabled if the defined classification is "Quantitative".
|
Range
|
Option
|
Checked
|
Unchecked
|
Simplified range
|
A customized range will be applied to the indicator. Fill out the following fields that will be enabled:
▪Configuration: Select the option that corresponds to the configuration that will be applied to the percentage of target achievement of the indicator in question: oThe higher the better: The measurement will be higher than the target set for the indicator. oThe higher the better: The measurement will be lower than the target set for the indicator. oStabilize: The measurement will be stable in relation to the target set for the indicator, that is, it must be a specific interval of the target. By selecting this option, the system will set the range classification to be Others, and only sets of 3 or 5 icons will be available for selection. ▪Icon: Select the icon set that will be used to represent the range items. ▪Intervals: According to the previously selected item set, fields to enter the values of the intervals that will compose the range will be displayed. Enter the desired intervals. |
Select, in the respective field, a previously configured range to classify the result of the indicator target achievement.
|
In practical terms:
By checking the "Simplified range" option, it will not be possible to edit the score and the colors of range items, nor to apply a calculation formula for the accumulated percentage of the range. For these situations, it is recommended to uncheck this option and use a regular system range.
|
|
Frequency
|
In this section, it is possible to define how the measurement of the indicator and its accumulation will be performed. To do that, the following fields are available:
Frequency
|
Select when the measurement of the indicator will be performed: Daily, Weekly, Bi-weekly, Monthly, Bimonthly, Quarterly, Four-month-period, Semester, Biannual, Yearly, or Based on event.
If the selected frequency is "Weekly", the following fields will be displayed:
▪Beginning of the week: Select the day that will be considered the first day of the week. For example, "Monday" can be considered the first day of the week instead of Sunday. ▪Reference day: Select the day of the week that will be used as a reference to indicate the month to which the week belongs. For example, by selecting "Thursday" as the reference day, the number of Thursdays the month has will be the number of the weeks in that month. |
Select one of the following options, to define how the accumulated target value will be calculated:
Target type
|
Measurement frequency
|
It will be necessary to enter the target of each period for the system to calculate the accumulated target value.
|
Accumulation period
|
It will be necessary to enter the accumulated value of the target for the system to distribute the target value between each period.
|
Accumulation
|
Operation
|
Select one of the following options to set how the indicator accumulation will be calculated:
▪Sum: The values of the target/measurement of the indicator periods will be added. ▪Average: The arithmetic average of the target/measurement values of the indicator periods will be calculated. ▪None: The indicator will not have its accumulated values calculated. ▪Manual: The user will fill the fields of the accumulated value of the target/measurement of the periods of the indicator. |
Accumulation start
|
This field will only be displayed if the previously selected frequency is "Monthly" or "Quarterly". Define when the accumulation calculation will start.
|
Frequency
|
Define the time interval in which the indicator accumulated values will be calculated. If the selected frequency is "Weekly", the "Beginning of the week" and "Reference day" fields will be displayed to define the first day of the week and the day that will be used as a reference to indicate the month to which the week belongs.
|
# of years
|
This field will only be enabled if the accumulation frequency is "Yearly". In this case, enter the number of years that will compose the time interval in which the accumulated values of the indicator are calculated.
|
2nd Accumulation
|
Configure this field to have another accumulated view of the indicator. In this case, select the Operation that will be performed to calculate the 2nd accumulation of the indicator. At this point, the other fields will be displayed for filling. These fields have been previously described in detail. The 2nd accumulation can be tracked by the execution and view screens, according to the configurations set in the view profile.
|
In practical terms:
If the indicator frequency is "monthly" and the accumulation frequency is "yearly", if the accumulation start is set as "4", the accumulated indicator value calculation will start in "April".
|
|
|
It is divided into the following sections:
Attributes
|
This tab will only be displayed if at least one attribute is associated in the Attribute tab on the type data screen. In that case, enter the value of the displayed attributes. Attributes that are required must necessarily have their values filled in. The way to enter an attribute varies according to the configurations established when creating it.
|
Sub-indicator
|
Use this section to associate the indicators on which the indicator in question depends. Thus, the targets and measurements of the associated sub-indicators in this section have an impact on the values of the indicator in question. On the side toolbar, the following buttons are available:

|
Click on this button to associate a sub-indicator with the indicator in question. On the screen that will be displayed, locate and select the desired indicator.
|

|
Click on this button to delete the sub-indicator selected in the list of records and, thus, disassociate it from the indicator in question.
|

|
Click on this button to move the profile selected in the list of records upwards in the structure.
|

|
Click on this button to move the profile selected in the list of records downwards in the structure.
|

|
Click on this button so that the sub-indicator selected in the list of records is displayed a level below the indicator in question, in the scorecard structure. If the sub-indicator does not have this configuration, it will be displayed in the scorecard structure below the upper element of the structure.
|
In order for the values arising from the association performed in this section to be applied correctly, you must set a formula in this indicator (upper-level indicator) through the "Formula" section described below.
|
|
Description
|
Fill out the field in this section to specify the indicator being created.
|
Formula
|
This section will only be available if the indicator classification is not "Qualitative". In it, it is possible to create formulas to calculate the targets and measurements of the indicator when it has several sub-indicators.
To do that, the following fields are available: Target, Accumulated target, Accumulated target 2, Measurement, Accumulated measurement, Accumulated measurement 2. Click on the  button next to each field and, on the screen that will be opened, enter the desired formula. The fields related to the "Target" must only be filled out if it has been defined that the indicator will have a target in the General tab. button next to each field and, on the screen that will be opened, enter the desired formula. The fields related to the "Target" must only be filled out if it has been defined that the indicator will have a target in the General tab.
▪See the Formula editor section for a detailed description about the use of this resource. In the Performance section, the specific formulas description can be found in the SE Performance component. ▪When the indicator being created is associated with the structure of a scorecard, the formulas configured in this section will also be imported, as well as the configured sub-indicators, and they can be edited. See the Formula and Formula per period sections for more information. |
|
Associated scorecard
|
This section will only be enabled when the indicator is associated with a scorecard. In it, it will be listed the scorecards that have the indicator in question associated with its structure. Click on the name of the listed scorecard to view its data.
|
|
After performing the necessary configurations, save the record.
|