|
To create a new inspection form, in the main screen toolbar, click on the  button. Select the type that classifies the inspection form that will be created and save the selection. button. Select the type that classifies the inspection form that will be created and save the selection.
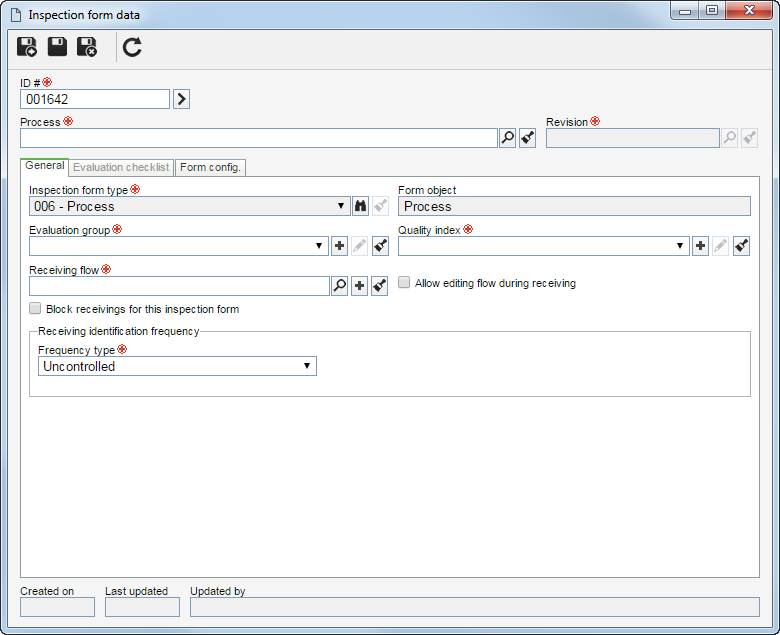
At this point, the system will display the data screen of the inspection form. Fill out the following fields:

Fields
|
ID #
|
Enter the number or code that identifies the configuration or click on the button next to this field to generate an automatic numbering.
|
Item
|
This field will be displayed when the form object, set in the inspection form type, is In progress product, Internal finished product (internal item), External finished product (external item), or Service. Select the item that will have its inspection configured. The system will fill out the Revision field with the number of the last item revision; however, it is possible to change it.
|
Supply
|
This field will be displayed when the form object set in the inspection form type is Raw material. Select the supply that will have its inspection configured. The system will fill out the Revision field with the number of the last supply revision; however, it is possible to change it.
|
Process
|
This field will be displayed when the form object, set in the inspection form type, is In progress product, Workflow, Workflow activity, Process or Process activity. Select the process that will have its inspection configured. The system will automatically fill out the Revision field with the number of the last process revision; however, it is possible to edit it.
|
Activity
|
This field will be displayed when the form object set in the inspection form type is In progress product, Workflow activity or Process activity. Select the process activity that will have its inspection configured.
|
Fill out the information in the following tabs:
Note: The record can only be saved after filling out the required fields in the General and Form config./Default configuration tabs.
Fields
|
Inspection form type
|
This field will be filled out with the previously selected inspection form type.
|
Form object
|
This field will be filled out with the object configured in the inspection form type.
|
Evaluation group
|
Select the group responsible for the tracking of the receiving quality indexes of this inspection form.
|
Quality index
|
Select the quality index that will be used to evaluate the receiving quality.
|
Receiving flow
|
Select the flow that will be used by the receivings. The flow defines the order and the deadline of each inspection step, in addition to defining what steps will have approval and who will be responsible for the approval.
|
Allow editing flow during receiving
|
Check this option to be able to change the flow during the identification step.
|
Block receivings for this inspection form
|
Check this option to prevent the creation of new receivings for this inspection form.
|
Receiving identification frequency
|
The fields of this section will not be displayed when the form object is Service or Raw material. In the Frequency type field, set the receiving record identification frequency:
▪Uncontrolled: Select this option in order for the frequency not to be controlled. ▪Execution date: Select this option to have the receiving executed on a specific date. oFrequency: Enter the frequency with which the receivings will be executed. In the Measurement units field, set if the frequency will be calculated in days, weeks, months or years. For example: every 3 days, every 2 months every year, among others. oNext execution: Select the date on which the receiving will be executed. When the inspection form is scheduled, the dates of the next executions will be calculated according to the frequency that is defined in the previous field. If the execution does not occur, after this date, the Inspection form due date task will be generated. oResponsible team: Select the team that will be responsible for the execution of the identification step of the receivings. ▪Inspect an instance every: This option is valid only when the form object type is "In progress product", Process, Process activity, Workflow or Workflow activity. Select this option to have the receiving to be executed after a determined frequency of the finished processes. oFrequency: Enter the finished process quantity that will make the inspection to be executed. oResponsible team: Select the responsible team for the execution of the receivings. |
|
Varies according to the inspection form object:
Tab name
|
Object type
|
Form config.
|
Product in progress, Internal finished product, External finished product, Workflow, Workflow activity, Process or Process activity.
|
Default configuration
|
Raw material or Service. In this case, it will be possible to replicate the inspection frequency and initial sample control configurations for all suppliers. To do that, simply click on the "Duplicate data" button in the Frequency of inspection step section.
|
Inspection frequency
|
Define the frequency that will be used in the inspection and whether there will be an initial sample control. To do that, fill out the following fields:
|
Inspection frequency
|
Select the used frequency for the inspection of the form object. The system offers the following options:
▪Skip-lot: This option aims to reduce the total number of inspections, after having proven a favorable quality history of the items, supplies or processes. By selecting this option, located next to the field, it is necessary to select the skip-lot (Type) and the Frequency applicable to the object of this inspection form. ▪Total inspection: This option causes all the receivings to be inspected. ▪Without inspection: This option causes no receiving to be inspected. ▪Last inspected record: This field is filled by the system with the last inspection carried out in the inspection form object. Click on the  button to view the inspection data. button to view the inspection data. |
Control initial sample
|
Select this option to have the initial sample of the item/revision/supplier to be controlled by the system. Initial sample indicates that the item was received, that is, it is still in the evaluation step and, therefore, all its characteristics will be inspected. If this control exists, every first receiving of the item/supplier in question will be treated as initial sample. If a new revision of the item is released, this is also considered as initial sample.
|
Sample
|
▪Status: Select the sample status. ▪Deadline: Enter the deadline for the sample inspection. |
Control initial sampling validity
|
▪Validity: Enter the number of days/weeks/months/receivings that the initial sample will have as validity. ▪Frequency: Select the frequency of the initial sample control. |
Comments
|
Enter the necessary comments about the inspection form.
|
|
Sampling rule
|
Define the sampling rule that will be used in the inspection of the object of this form:
Option
|
Register readings
|
Select this option to have the sampling creation to be performed from the characteristic readings of the object of this form.
|
Register averages
|
Select this option so that the sampling records are carried out from the average of the readings, that is, at the moment of the inspection, the maximum, minimum and average values must be entered, instead of all the values of the readings of the item characteristic.
|
Rule
|
Sampling plan
|
Select this option to use the sampling plan in the readings of the item characteristics. This plan contains the necessary configurations for the system to remove a sample size from the receiving. Click on the  button, located next to the Rule field to perform a simulation of the sampling plan. Fill out the following information: button, located next to the Rule field to perform a simulation of the sampling plan. Fill out the following information:
▪Sampling plan: Select the sampling plan that will be used in the reading of the item characteristics: Simple, Double or Multiple. ▪Inspection level: Select the level of inspection that will be applied to the item characteristics. This level secures a relationship between the lot size and the sample size: oLevel 01: when the inspection costs are high. oLevel 02: normal statuses. oLevel 03: when the inspection costs are reduced. oLevels S1 to S4: when the cost of destructive testing is high for small samples or large tolerated risks. These levels can be considered adequate when using repetitive processes by a good quality supplier. ▪Inspection type: Select the regime that establishes the severity of the characteristic inspection of the item: Reduced, Normal or Tightened. ▪AQL: Select the acceptable quality level (AQL) for the item in question. |
Sampling tables
|
Select this option to use a sampling table in the readings of the item characteristics. In that case, in the respective field, select a sampling table and the respective work regime.
|
Defined size
|
Select this option so that the sample to be inspected may have a defined size. For that, in the Sample size field, enter the desired value. Also, set the maximum quantity of rejects that may exist.
|
Percentage
|
Select this option so that in the Percentage field, the percentage of the object that will be inspected is entered. Also, set the maximum percentage of rejects that may exist.
|
Click on the "Replicate data" button to replicate the sampling rule configurations on all the characteristics of the form.
|
|
Characteristic
|
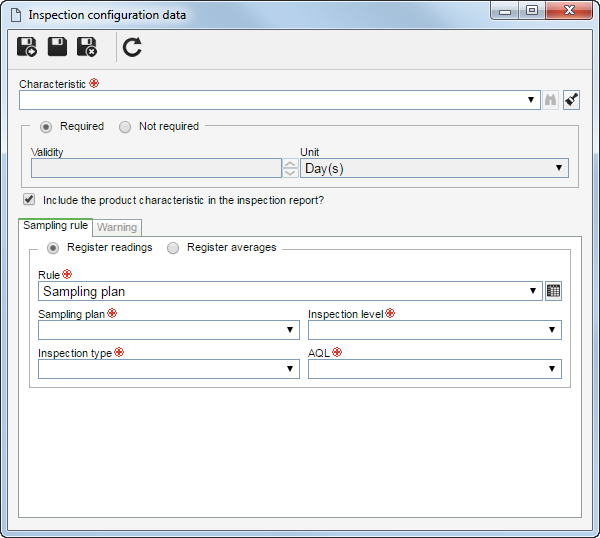
Associate the characteristics that will be inspected. To do that, click on the  button and fill out the fields on the screen that will be displayed: button and fill out the fields on the screen that will be displayed:

1.Fill out the following fields: ▪Characteristic: Select the characteristic to be inspected. Remember that it will only be displayed the characteristics of the (item, supply, process or process activity) object of the inspection form. Add the characteristics to the object to configure their inspection. ▪Include the product characteristic in the inspection report? Select this option to have the characteristic in question to be added to the inspection report.
2.Use the Sampling rule tab to set the sampling rules of the characteristics. These fields will come filled according to the configurations established in the Sampling rule section described above; however, they may be edited.
3.In the Warning tab must be entered the warnings regarding the inspection in case of special characteristics. The warning may be used in the characteristic inspection step.
4.Save the record after performing all the necessary configurations.
|
|
|
  Use this tab to associate the checklists with the questions to be answered during the inspection. For that, click on the Use this tab to associate the checklists with the questions to be answered during the inspection. For that, click on the  button on this tab and on the screen that will be displayed, locate and select the desired checklists. button on this tab and on the screen that will be displayed, locate and select the desired checklists.
|
This tab will only be displayed when the object of the inspection form is Raw material, Service or External finished product. Through this tab, assign and configure the suppliers of items and supplies that will be inspected. To do that, click on the  button. button.
In this tab can be displayed the suppliers associated with the item or supply when creating the inspection form. In that case, click on the  button to change the configuration of the supplier in question. button to change the configuration of the supplier in question.
|
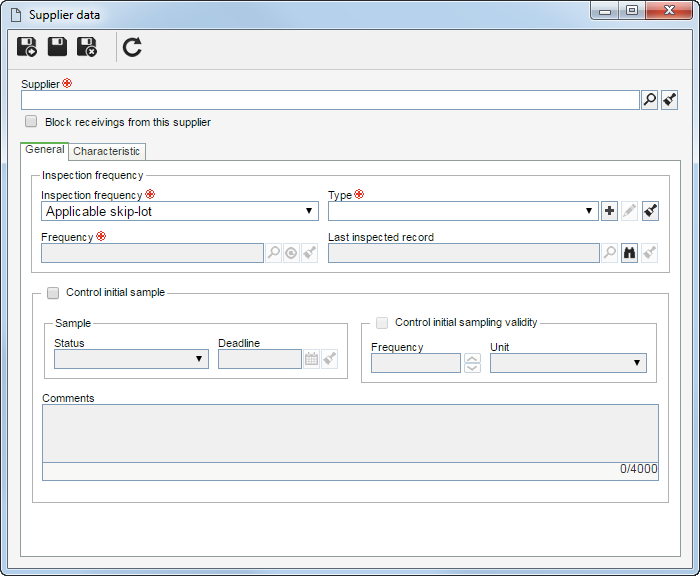
Fill out the following information on the supplier data screen:

Supplier: Select the supplier of the item or supply. Remember that only the suppliers of the item/input of the inspection form will be presented. Add the suppliers to the item/supply so that they can have their inspection configured.
Block receivings from this supplier: Select this option to block the receivings of the supplier.
Fill out the fields in the following tabs:
Inspection frequency
|
Inspection frequency
|
Select the frequency that will be used in the inspection of the item/supply for the supplier in question. The following options are available:
▪Skip-lot: This option aims to reduce the total number of inspections, after having proven a favorable quality history of the items/supplies. By selecting this option, in the field next to it, you must select the skip-lot (Type) and the Frequency applicable to the supplier of this item/supply. ▪Total inspection: This option causes all the receivings of the supplier to be inspected. ▪Without inspection: This option causes no receiving of the supplier to be inspected. ▪Last inspected record: This field is filled out by the system with the last inspection carried out in the supplier. Click on the  button to view the inspection data. button to view the inspection data. |
Control initial sample
|
Select this option to have the initial sample of the object to be controlled by the system. Initial sample indicates that the item/supply was received, that is, it is still in the evaluation step and, therefore, all its characteristics will be inspected. If this control exists, every first receiving of the item/supply of the supplier will be treated as initial sample. If a new revision of the item/supply is released, this is also considered as initial sample.
|
Sample
|
Select the sample status and its deadline for inspection.
|
Control initial sampling validity
|
Select the frequency of the initial sample control. In the Unit field, set if the frequency will be calculated in days, weeks, months or by sample receivings.
|
Comments
|
Enter the necessary comments about the supplier configuration.
|
Some fields of this tab will come filled regarding the configurations established in the default Configuration tab, in the inspection form data, however, they may be changed.
|
|
In this tab, associate the control characteristics of the object that will be inspected for that supplier.
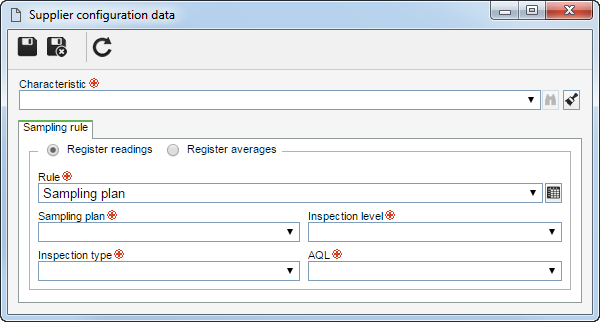
To do that, click on the  button. On the screen that will open, select the Characteristic that will be inspected. Remember that only the characteristics of the object (item or supply) of the inspection form will be displayed. button. On the screen that will open, select the Characteristic that will be inspected. Remember that only the characteristics of the object (item or supply) of the inspection form will be displayed.

The following fields will also be available in the Sampling rule tab:
Option
|
Register readings
|
Select this option so that the sampling records are carried out from the readings of the characteristics of the object of the inspection form.
|
Register averages
|
Select this option, so that the sampling records are carried out from the average of the readings, that is, at the moment of the inspection, the maximum, minimum and average values must be entered, instead of all the values of the readings of the characteristic of the object of the inspection form.
|
Rule
|
Sampling plan
|
Select this option to use the sampling plan in the readings of the item characteristics. This plan contains the necessary configurations for the system to remove a sample size from the receiving. Click on the  button, located next to the Rule field to perform a simulation of the sampling plan. Fill out the following information: button, located next to the Rule field to perform a simulation of the sampling plan. Fill out the following information:
▪Sampling plan: Select the sampling plan that will be used in the reading of the item characteristics: Simple, Double or Multiple. ▪Inspection level: Select the level of inspection that will be applied to the item characteristics. This level secures a relationship between the lot size and the sample size: oLevel 01: when the inspection costs are high. oLevel 02: normal statuses. oLevel 03: when the inspection costs are reduced. oLevels S1 to S4: when the cost of destructive testing is high for small samples or large tolerated risks. These levels can be considered adequate when using repetitive processes by a good quality supplier. ▪Inspection type: Select the regime that establishes the severity of the characteristic inspection of the item: Reduced, Normal or Tightened. ▪AQL: Select the acceptable quality level (AQL) for the item in question. |
Sampling tables
|
Select this option to use a sampling table in the readings of the item characteristics. In that case, in the respective field, select a sampling table and the respective work regime.
|
Defined size
|
Select this option so that the sample to be inspected may have a defined size. For that, in the Sample size field, enter the desired value. Also, set the maximum quantity of rejects that may exist.
|
Percentage
|
Select this option so that in the Percentage field, the percentage of the object that will be inspected is entered. Also, set the maximum percentage of rejects that may exist.
|
|
|
Save the record.
|


