Issuing a copy protocol |
|
|
The copy protocols may be issued in the following locations:
▪Management a.In the list of records, locate and select the desired protocol. b.After that, click on the
▪My tasks a.Select the document copies that will be sent, from the list of records. b.After that, click on the
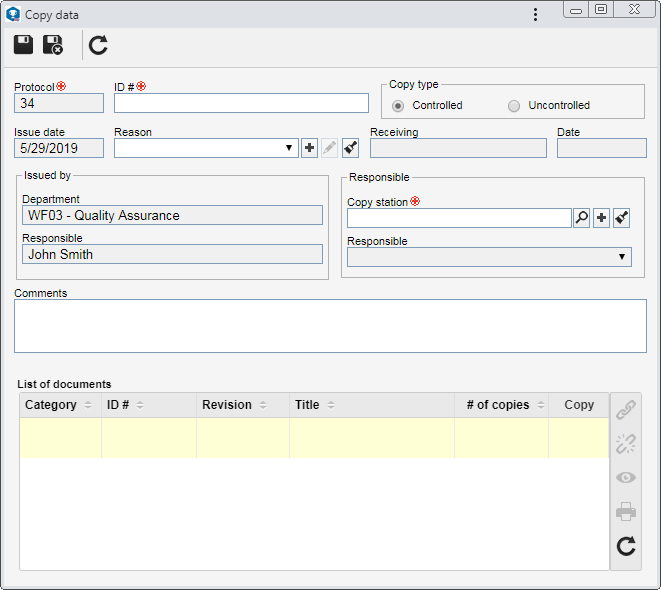
Then, perform the following steps: 1.On the protocol data screen, fill out the following fields that will be available:
Protocol: Displays the ID # of the protocol. Every time a protocol is registered, a sequential number is generated. ID #: Enter a name or a code for the copy protocol being added. Copy type: ▪Controlled: Select this option if the copy will be sent to a station. With this, they will be controlled by SE Document, so that with each new revision, obsolete copies are collected and replaced by the new version. ▪Uncontrolled: Select this option if the copy will be sent to an external addressee and will not be controlled by the SE Document, that is, with each new version the system will not alert to the need to collect and replace the obsolete copies. Issue date: Displays the date in which the copy protocol is being added. Reason: Fill out this field to enter a reason to distribute the copies. In this case, select the desired reason. Use the other buttons next to the field to add a new copy distribution reason, edit the selected reason and clear the field. Receiving: Displays the data of the user who will confirm the copy receiving. Date: Displays the date when the user confirms the copy receiving. Issued by: Displays the name of the user (responsible) who is registering the protocol and the department to which the protocol belongs. Responsible: The fields will vary according to the previously selected copy type: Controlled: ▪Copy station: Select the copy station where the copies will be sent. Use the other buttons next to the field to add a new copy station and clear the field. ▪Responsible: Displays the data of the user responsible for receiving in the copy station, but it can be edited and other responsible users can be defined, if any. Uncontrolled: ▪Company: Enter the company to which the copies will be sent. ▪Responsible: Enter the name of the responsible for the receiving of the copies in the company. Comments: Fill out this field with any relevant comments about the copies that will be distributed.
2.Save the record. At this point, the other features on the screen will be enabled.
3.In the Document list section at the bottom of the screen, associate the documents that will have their copies distributed. To do that, click on the a.Locate the desired documents. To do that, use the search filters as desired and click on the Search button. b.According to the values entered in the filters, the result will be displayed in the list of records. Only those documents where the logged user has the Distribute copy control enabled in the security list and those whose status is not "Issue", "Cancelled" or "Indexing approval" will be displayed. c.In the # of copies field, enter the number of printed copies that must be distributed. d.Once done, save your selection.
4.If any Controlled Copy of the document list is not associated with the copy station, the system will ask if you want to perform the association. Choose the desired option: ▪OK: The document will be associated to the station defined with the addressee in the "Responsible" field. ▪Cancel: The document will be removed from the document list by the system. If the document is already associated with the copy station, the system will ask if you wish to add the number of copies to the quantity planned in the station. Choose the desired option: ▪OK: The number of copies planned in the station will be updated according to the number of copies being distributed. Thus, when a new distribution protocol is opened, the number of copies distributed in the current protocol will be displayed as planned. ▪Cancel: The number of copies planned in the station will not be updated according to the number of copies being distributed.
Save the record after the necessary configurations. At this point, the system will ask if the user wishes to confirm the receiving of the copies. Click on the desired option:
In practical terms:
|
|||||||