|
To add new media, click on the  button on the main toolbar. On the screen that the system will display, select the type to classify the media and save your selection. button on the main toolbar. On the screen that the system will display, select the type to classify the media and save your selection.
To edit the data of media, select it in the list of records and click on the  button. button.
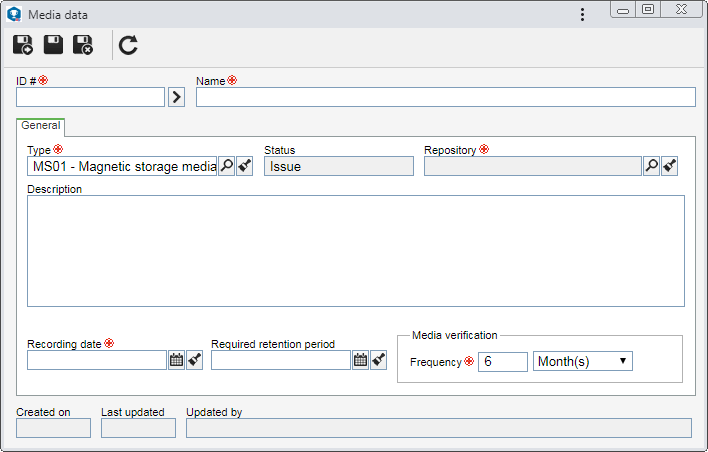
On the screen that will be opened, enter an ID # and a name for the media. To enter an ID # more easily, the button next to the field can be used to generate a new sequential number.

Note: To create media, it is necessary to fill out the required fields in the General tab. After saving the data for the first time, the other tabs will be available to be filled out.
Field
|
|
Type
|
This field displays the media type selected during the addition, although it is possible to edit it. In that case, select the type that will classify the media.
|
Status
|
Displays the status in which the media is found: issue, being recorded, burned to media or cancelled.
|
Repository
|
This field will only be enabled to be filled out if the "Control media archiving in storage place" option is checked in the type that classifies the media. In this case, select the repository in which the media that is being registered will be stored. Only the repositories of the "Media repository" type will be available for selection.
|
Description
|
Fill out this field to record important information about the media.
|
Recording date
|
Select the estimated date for the documents to be burned to media.
|
Retention deadline
|
Select the date until which the media will remain stored.
|
Media verification
|
This field will only be enabled to be filled out if the "Media verification" option is checked in the type that classifies the media. Thus, the system fills it out with the default validity period defined in the type, but it is possible to edit it. In this case, define, in days, months or years, the time interval between two verifications.
|
|
The data of the documents that were burned to the media are displayed: category, ID #, recording date, ID # of position in the media and title. On the side toolbar, the following buttons are available:

|
Click on this button to view the document data screen selected from the list of records.
|

|
Click on this button to view the electronic file of the document selected in the list of records.
|
Media burning registration is performed through the Management  Document archiving Document archiving  Media burning menu. Media burning menu.
|
|
This tab will only be displayed if the "Media verification" option is checked in the type that classifies the media. In it, the results obtained after carrying out the media verification are recorded. On the side toolbar, the following buttons are available:

|
Click on this button to record the media verification. See further details about this operation in the Verify media topic below.
|

|
Click on this button to view the data of the media verification selected in the list of records.
|
Verifying media
1.
|
Click on the  button on the sidebar. button on the sidebar.
|
2.
|
The Media, Type and Storage place fields on the screen that will open are filled out by the system with the corresponding information related to the media. Fill out the following fields:
▪Recording date: Select the date when media recording was performed. ▪Result: Enter if the media preservation state is "OK" or "Not OK" (in case it needs to be replaced). ▪Verification comments: Enter information about the result of the media verification process. |
3.
|
Once done, save the record. The media verification must be performed according to the frequency specified in the General tab.
|
|
|
After setting the necessary configurations, save the record.
|


