|
Use this section to view and configure the days and shifts on which the training is planned to occur, as well as to perform the reservation of the necessary classrooms and audio-visual resources. To do that, use the following subsections:
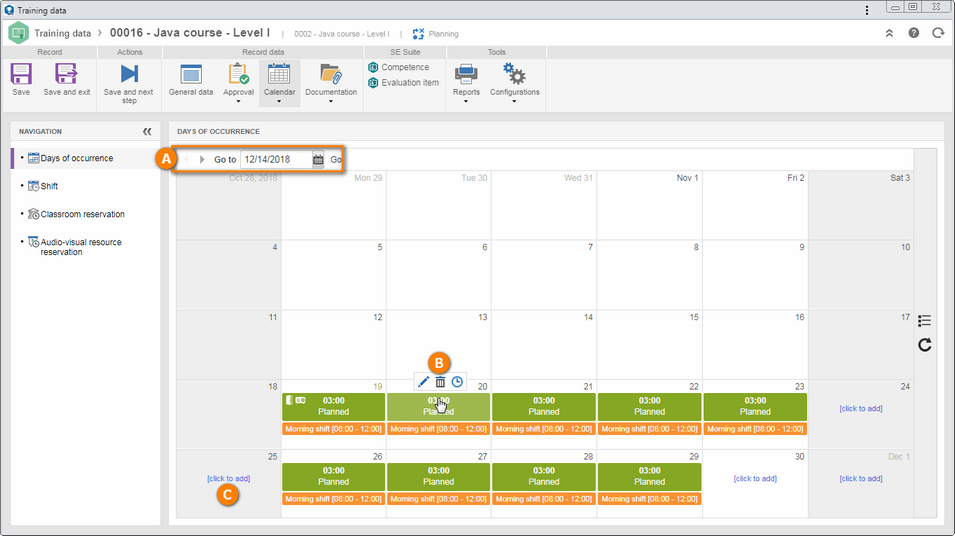
The days in which the training will occur will be displayed in a calendar according to the image displayed below. The alphabetical letters identify each available item:

A
|
 The options in the upper part allow browsing through the pages of the calendar or going to a specific date. The options in the upper part allow browsing through the pages of the calendar or going to a specific date.
|
B
|
 When hovering the mouse over a day in which there will be a training, the options that allow editing the workload set for that day, deleting the occurrence day (if there are no trainings in that day) and defining one or more shifts associated with the occurrence day will be displayed (for the last option, simply check the shifts in which the training will occur and uncheck the shifts in which it will not occur). When hovering the mouse over a day in which there will be a training, the options that allow editing the workload set for that day, deleting the occurrence day (if there are no trainings in that day) and defining one or more shifts associated with the occurrence day will be displayed (for the last option, simply check the shifts in which the training will occur and uncheck the shifts in which it will not occur).
|
C
|
 If after deleting an occurrence day, you want to add it again, use the Click to add option and, on the screen that will be displayed, enter the workload of the training day. If after deleting an occurrence day, you want to add it again, use the Click to add option and, on the screen that will be displayed, enter the workload of the training day.
|
|
In this section, it is possible to manage the shifts on which the training will take place. The shifts associated in this section will be associated with the training occurrence days. On the side toolbar, the following buttons are available:

|
Click on this button to associate a shift with the training. On the screen that will be displayed, locate and select the desired shifts. Use the CTRL and SHIFT keys on the keyboard or check next to each record to select more than one shift at a time.
|

|
Click on this button to disassociate the shift selected in the list of records from the training. If the shift is associated with training occurrence days, the system will issue a message warning about the fact and requesting a confirmation. Click on OK to perform the deletion.
|

|
Click on this button to view the data of shift selected in the list of records.
|
If the training already has a shift associated with it and, later on, another shift is associated, the system will ask if you wish to apply the new shift to the training occurrence days. Click on "OK" to confirm or on "Cancel" for the shift to be associated with the training, but not with the occurrence days. In this case, it is possible to define the shifts through the calendar on the "Days of occurrence" section.
|
|
Use this section to perform the reservation of the classroom where the training will be conducted and the audio-visual resources that will be used in it. See how to perform this operation:
|
1.
|
 Click on the Click on the  button on the side toolbar of the first list of records to perform the reservation of a classroom. button on the side toolbar of the first list of records to perform the reservation of a classroom.
|
2.
|
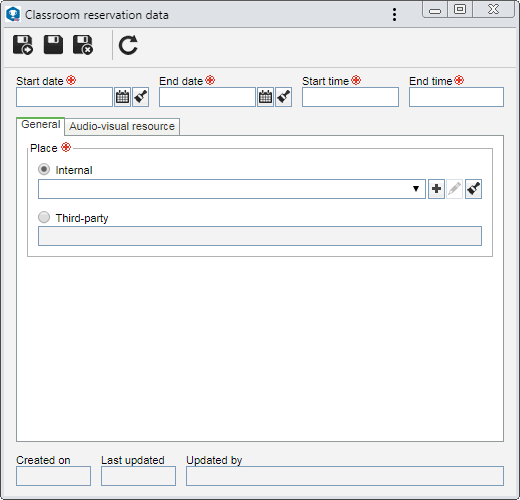
Fill in the following fields in the window that will be displayed:

Field
|
Start date
|
Displays the start date defined for the training, and it is possible to edit it. In this case, select the date from which you wish to reserve the classroom.
|
End date
|
Displays the end date defined for the training, and it is possible to edit it. In this case, select the date up to which you wish to reserve the classroom.
|
Start time
|
Enter the time on which you want the classroom reservation to start.
|
End time
|
Enter the time on which you want the classroom reservation to end.
|
|
3.
|
Use the General tab to define the location of the classroom. To do that, select one of the following options:
Place
|
Internal
|
Select this option if the room where the training will occur is in the organization itself. In the field that will be enabled, select the desired classroom. Use the other buttons next to the field to add a new classroom and use it in training, edit the room data or clear the field.
|
External
|
Select this option if the room where the training will occur is outside the organization. In the field that will be enabled, enter the location of the classroom.
|
|
4.
|
Save the record, but do not close the data screen. At this point, the Audio-visual resource tab will be enabled to be filled out.
If the period selected previously covers a day in which you are not scheduled to have training, the system will ask if you want to add that day to the calendar. Click OK to add that day to the calendar as a training day. To skip this day and not add it to the training, click on Cancel.
|
|
5.
|
 Use the Audio-visual resource tab to associate the audio-visual resource that will be used in the classroom being reserved. To do that, click on the Use the Audio-visual resource tab to associate the audio-visual resource that will be used in the classroom being reserved. To do that, click on the  button on the side toolbar and fill in the fields in the window that will be displayed: button on the side toolbar and fill in the fields in the window that will be displayed:
Field
|
Audio-visual resource
|
Select the audio-visual resource you wish to allocate for the classroom. Use the other buttons next to the field to add a new audio-visual resource and use it in the classroom, edit the data of the selected audio-visual resource and clear the field.
|
Start time
|
Enter the time on which you want the allocation of the audio-visual resource to start.
|
End time
|
Enter the time on which you want the allocation of the audio-visual resource to end.
|
Quantity
|
Enter the number that matches the number of audio-visual resources that will be allocated.
|
After filling in the fields, save the record. Repeat the procedure to allocate as many audio-visual resources as needed. Use the other side toolbar buttons to edit and delete the allocation of an audio-visual resource for the classroom.
|
6.
|
When all necessary fields are filled out, save the record of the classroom reservation. Use the other buttons on the side toolbar of the first list of records to edit and delete the selected classroom reservation.
|
7.
|
The second list of records displays the audio-visual resources allocated for the classroom selected in the first list of records. Use the buttons on the side toolbar in this list to allocate a resource for the classroom selected in the first list (step 5), edit and delete the allocation of the selected resource.
|
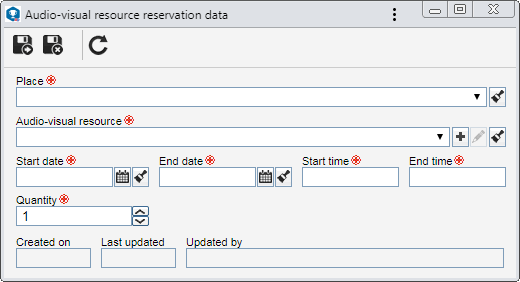
This section displays all audio-visual resources that have already been reserved to be used in the training in question, regardless of the classroom to which they have been allocated. In order to perform the reservation of a new audio-visual resource, click on the  button and fill in the fields in the data screen that will be displayed: button and fill in the fields in the data screen that will be displayed:

Field
|
Place
|
Select the location to which the audio-visual resource will be allocated. The options available for selection will vary according to the location reserved earlier.
|
Audio-visual resource
|
Select the audio-visual resource you wish to reserve to be used in the training. Use the other buttons next to the field to add a new audio-visual resource and use it in the training, edit the data of the selected audio-visual resource and clear the field.
|
Start date
|
Select the date from which you wish to reserve the resource.
|
End date
|
Select the date up to which you wish to reserve the resource.
|
Start time
|
Enter the time from which you wish to reserve the resource.
|
End time
|
Enter the time up to which you wish to reserve the resource.
|
Quantity
|
Enter the number that matches the quantity of audio-visual resources that will be allocated.
|
After filling in the fields, save the record. Repeat the procedure to reserve as many audio-visual resources as needed. Use the other side toolbar buttons to edit and delete the reservation of an audio-visual resource.
|
|


