|
To create a storeroom, in the main screen toolbar, click on the  button. button.
See a quick and easy way of creating storerooms in the "Create a storeroom" topic of the SE Storeroom Quick Guide!
|
On the screen that will be displayed, select the type that will classify the storeroom being created and save your selection.
At this point, on the storeroom data screen that will be opened, enter an ID # and a name for the storeroom:
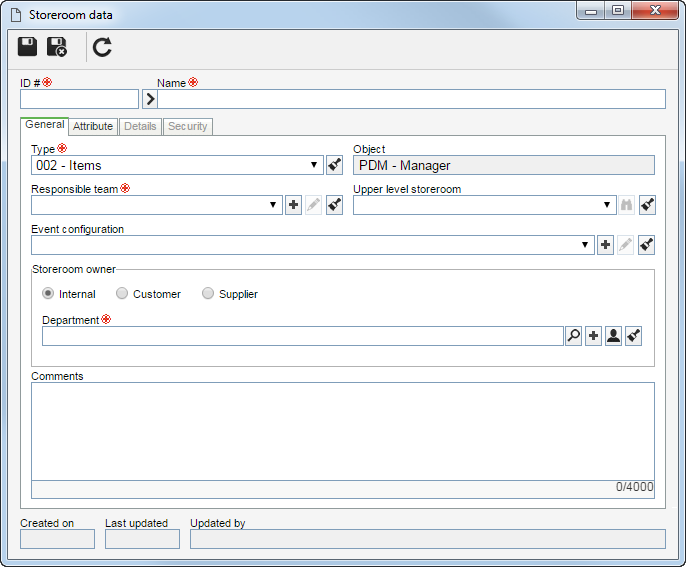
Note: To successfully create a storeroom, it is necessary to fill out the required fields in the General tab. After saving the data for the first time, the other tabs will be available to be filled out.
General
Field
|
|
Type
|
This field is filled out by the system with the previously selected storeroom type; however, it is possible to edit it.
|
Object
|
This field is filled out by the system with the object type (Waste, PDM, Supply) the storeroom will store, according to the configurations performed in its type.
|
Responsible team
|
Select the team that will be responsible for the storeroom that is being created. Use the other buttons located next to the field to create a new team, edit the data of the selected team, and clear the filled out value.
|
Upper level storeroom
|
If the storeroom being created is a sub-storeroom, select the storeroom to which it belongs.
|
Event configuration
|
Select the configuration applied to the events of the storeroom that is being created. Use the other buttons located next to the field to create a new configuration, edit the data of the selected configuration and clear the value filled out in the field.
|
Storeroom owner
|
Select the owner of the storeroom:
▪Internal: In the Department field that will be enabled, select the department of the organization to which the storeroom is located. Use the other buttons placed next to the field to create a new department, fill in the field with the logged user department and clear the filled in value. ▪Customer: In the Customer field that will be enabled, select the customer of the organization to which the storeroom belongs. Use the other buttons located next to the field to create a new customer, edit the data of the selected customer and clear the filled in value. ▪Supplier: In the Supplier field that will be enabled, select the supplier of the organization to which the storeroom belongs. Use the other buttons located next to the field to create a new supplier, edit the data of the selected supplier and clear the filled in value. |
Comments
|
Enter relevant information about the storeroom being created.
|
Attribute
The Attribute tab will only be displayed on the screen, if in the Attribute tab of the storeroom type data screen is associated an attribute. In this case, enter the value of the attributes that complement the storeroom. Those attributes that are required must necessarily, have their values filled in. The blocked attributes will be filled in by the system with the default value defined when associating it with the storeroom. Remember that the way to enter an attribute value varies according to the configurations set when creating its record.
Details
Location
|
In this section, it is possible to view and add, in a structure, the storage places and repositories the storeroom being created contains. For this and other operations, use the sidebar buttons in this section:
|
Click on this button to add a new storage place in the storeroom structure. See more details about this operation in the Creating a location section. Before clicking on this button, it is necessary to select a storeroom or an upper storage place.
|

|
Click on this button to edit the storage place data selected in the storeroom structure.
|

|
Click on this button to delete the storage place selected in the storeroom structure.
|

|
Click on this button to change the status (active or inactive) of the repository selected in the storeroom structure.
|
|
Sub-storeroom
|
In this section, it is possible to associate other storerooms that belong to the storeroom. To do this, click on the button on the side toolbar and on the screen that will open, locate and select the desired storeroom. Save the selection after that.
This section will also display the storerooms the storeroom in question was associated with through the "Upper level storeroom" field.
|
|
Storeroom objects
|
In this section, it is possible to associate objects that are stored in the storeroom. For this and other operations, use the sidebar buttons in this section:
|
Click on this button to associate a new object with the storeroom. See more details about this operation in the Storeroom objects section.
|
|
Click on this button to edit the controls or set the storage place of the object associated with the storeroom. Select the desired record before clicking on this button.
|
|
Click on this button to disassociate an object from the storeroom. Select the desired record before clicking on this button.
|
Use the search field at the top of this section to locate the desired storeroom object more easily.
|
|
Capacity
|
In this section, it is possible to parameterize controls for the capacity of the storeroom. To do that, the following options are available:
Field
|
|
Control capacity of storeroom repositories
|
Check this option to limit the quantity of repositories of the storeroom. To do this, in the Maximum capacity field, enter the maximum number of repositories that the storeroom may have.
|
Control capacity per occupied area
|
Check this option to limit the area of the storeroom that may be occupied. To do that, fill out the following fields:
▪Available area (m²): Enter how many square meters of the storeroom are available to be used. ▪Notify on: Enter the percentage of the occupied area, which upon being reached, will generate a notification to the team responsible for the storeroom. |
|
Security
In the Security tab, it is possible to configure the security list of the storeroom. For that, use the sidebar buttons in this section:
|
Click on this button to add a new type of access to the storeroom security list. See more details about this operation in the Security section.
|
|
Click on this button to edit the data of an access type selected in the storeroom security list.
|
|
Click on this button to delete an access type from the storeroom security list. Select the desired record before clicking on this button.
|
After filling in all the necessary fields, save the record.
|