|
See how to plan the transport of storeroom objects:
1.
|
On the main screen toolbar, click on the  button. button.
|
2.
|
On the screen that will be displayed, select the type that will classify the transport being planned and save your selection.
|
3.
|
Fill in the following fields on the screen that will be displayed:
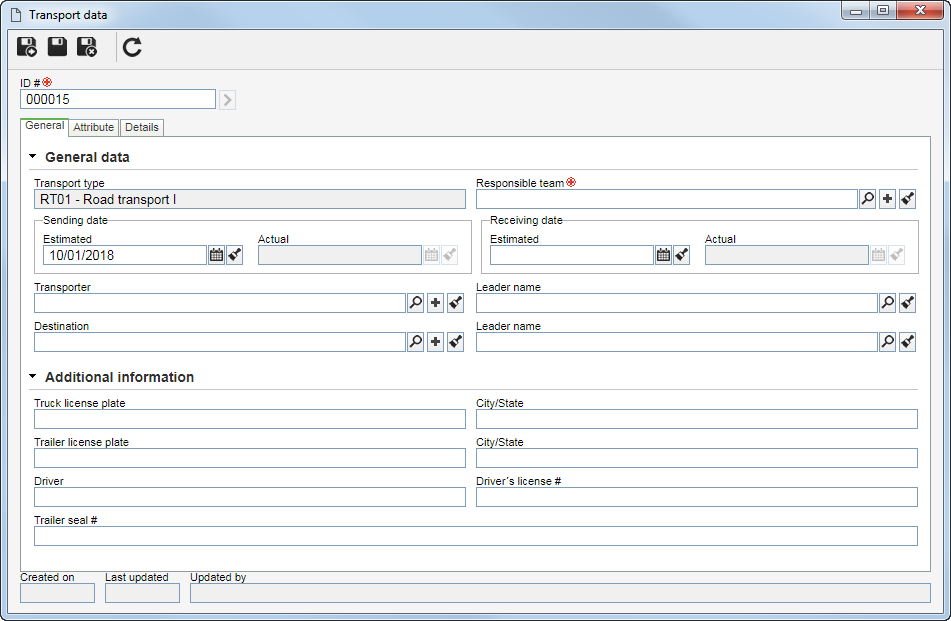
▪The image refers to the transport of an item. It is important to point out that the fields displayed on the transport data screen will vary according to the object configured in the transport type selected previously (step 02). ▪As the way to plan a transport is similar for all object types (supply, item, or waste), the description will be made in this section only. |
ID #: Enter a number or code to identify the transport. If you prefer, use the arrow next to this field to generate an automatic identifier. Remember that if the use of an identification mask was configured in the transport type, when generating the automatic identifier, the respective mask will be displayed. Remember that the ID # generated through the mask may only be edited if the Enable ID # change option is checked on the data screen of the transport type.
|
4.
|
In the General data section in the General tab, the following fields are available:
Field
|
|
Transport type
|
This field is filled out by the system with the data of the transport type selected in step 02.
|
Responsible team
|
This field will be filled out by the system with the default team configured in the transport type. Otherwise, select the team that will be responsible for planning, sending and confirming the transport receiving.
|
Sending date
|
In the Estimated field, enter the planned date for the transport to leave. The Actual field will only be enabled when sending the transport.
|
Receiving date
|
In the Estimated field enter the planned date for the transport to arrive at the destination. The Actual field will only be enabled during the transport receiving confirmation.
|
Generator
|
This field will only be displayed if the transported object is a waste. Select the generator of the waste that will be transported. Use the other buttons located next to the field to: create a new generator, edit the data of the selected generator and clear the filled out value. In the Leader name field, select the responsible user for the generator. Note that only the user defined as the responsible for the company will be available for selection on the generator data screen (SE Waste).
|
Transporter
|
Select the transporter that will transport the object. Use the other buttons located next to the field to: create a new transporter, edit the data of the selected transporter and clear the filled in value. In the Leader name field, select the responsible user for the transporter. Note that the system will make available for selection the users defined as contacts when creating the transporter.
|
Destination
|
Select the supplier to which the object was sent. Use the other buttons located next to the field to: create a new supplier, edit the data of the selected supplier and clear the filled out value. In the Leader name field, select the responsible user for the supplier company. Note that the system will make available for selection the users defined as contacts when creating the supplier.
|
When planning the transport of a waste, if it is associated with an environmental permit and such permit has the 'Control of transported waste amount' option checked, the 'Generator', 'Transporter', and 'Destination' fields must be filled in with the generator, transporter, destination company defined for the waste through the SE Waste component. If the configured companies are not associated, the system will inform that the selected companies do not meet the waste or the environmental permit and will enable the screen for a new selection to be made.
|
|
5.
|
In the Additional information section in the General tab, fill in the following fields referring to the used means of transportation:
Field
|
|
Truck license plate
|
Enter the license plate of the truck (tractor) that will be used in the transport being planned. In the City/State field, enter the city and state of the trailer license plate.
|
Trailer license plate
|
Enter the license plate of the trailer (body) that will be used in the transport being planned. In the City/State field, enter the city and state of the trailer license plate.
|
Driver
|
Enter the name of the driver of the truck that will be used in the transport.
|
Driver's license #
|
Enter the Driver's license number of the truck driver.
|
Trailer seal #
|
If the transport being planned is performed with a closed-cargo truck, enter the security seal number.
|
|
6.
|
The Attributes will only be displayed if an attribute has been associated with the type that classifies the transport in question. In this case, enter the value of the attributes that complement the planning of the transport. Those attributes that are required must, necessarily, have their values filled in. The blocked attributes will be filled in by the system with the default value defined when associating it with the transport type. Remember that the procedure to fill out an attribute, varies according to the configurations established when the attribute was registered.
|
7.
|
Save the record, but do not close the data screen. At this point, the sections and fields of the Details tab will be enabled.
|
8.
|
In the Description section in the Details tab, enter important information about the transport being planned.
|
9.
|
In the Instruction section, of the Details tab, enter the special handling instructions and additional information and the instructions in case there is any discrepancy in the described recommendations referring to the objects whose transport is being planned.
|
10.
|
The name of the section referring to the object that will be transported will vary according to the object type defined in the transport type: Supply, Item or Waste. See the Object section for more information about the association of the objects or repositories that will be transported.
|
11.
|
In the Cost section in the Details tab, it is possible to add the costs involved in the transport being planned. See the Cost section for more information about how to add the expenses and revenues of a transport.
|
12.
|
In the Documentation section of the Details tab, it will be possible to associate attachments and other documents related to the transport:
Field
|
|
Attachment
|
Use this section to associate the attachments related to the event. Refer to the Adding attachments section for further details on how to add and/or associate attachments.
|
Document
|
Use this section to add or associate the documents related to the transport. Refer to the Adding documents section for further details of how to add and/or associate documents from SE Document.
|
|
13.
|
After filling in all the necessary fields, save the record. At this point, the transport will be presented in the Execution  Transport Transport sending menu, to record its sending to the addressee. Transport Transport sending menu, to record its sending to the addressee.
|
|