|
See how to create a storeroom object processing:
1.
|
On the main screen toolbar, click on the  button. button.
|
2.
|
On the screen that will be displayed, locate and select the storeroom whose object will be processed and save the selection made.
|
3.
|
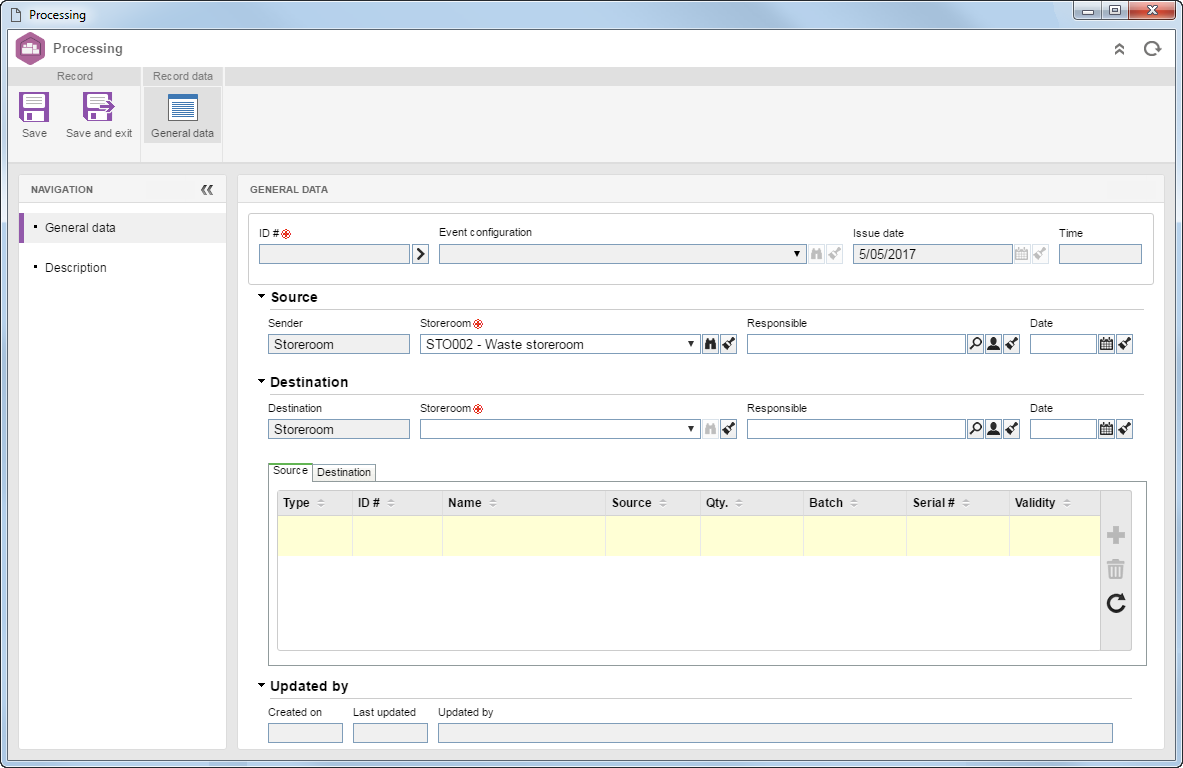
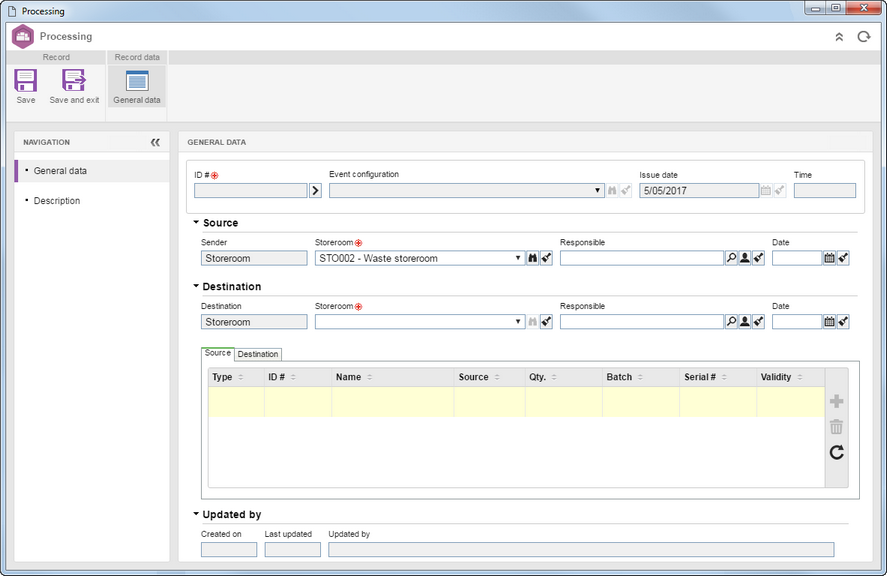
At this point, the processing data screen will be displayed:
|
4.
|
In the Record data  General data section, fill in the following fields: General data section, fill in the following fields:
Field
|
|
ID #
|
Enter a number or code to identify the processing. If you prefer, use the arrow next to this field to generate an automatic identifier. Remember that, if an event configuration was associated with the storeroom and, in it, the use of an identification mask was configured, when generating the automatic ID #, the respective mask will be displayed. Remember that the ID # generated through the mask may only be edited if the Enable ID # change option is checked on the data screen of the configuration.
|
Event configuration
|
This field will be filled out with the event configuration associated with the storeroom. If there is no configuration associated with the storeroom, this field will be displayed blank. Use the  button located next to the field to view the event configuration data displayed. button located next to the field to view the event configuration data displayed.
|
Date
|
This field is filled out by the system with the date the processing is being performed on.
|
Time
|
This field is filled out by the system with the time this operation was performed at when saving the record for the first time.
|
Source
|
Fill out the following fields to inform where the object that will be processed comes from:
▪Storeroom: This field is filled in by the system with the storeroom selected before (step 02); however, it is possible to edit it. ▪Responsible: Select the user who will be responsible for sending the object for processing. Use the other buttons next to the field to fill it in with the logged user data and clear the value in the field. ▪Date: Select the date on which the object was moved out of the storeroom for processing. |
Destination
|
Fill out the following fields to inform where the object will be stored at after being processed:
▪Storeroom: Select the storeroom to which the object will be sent to. ▪Responsible: Select the user who will be responsible for the object receiving in the storeroom. Use the other buttons next to the field to fill it in with the logged user data and clear the value in the field. ▪Date: Select the estimated date for the object delivery in the storeroom. |
|
5.
|
Save the record, but do not close data screen. At this point, the other sections and fields will become enabled.
|
6.
|
In the Source tab of the list of records at the bottom of the Record data General data section, it is possible to add the objects of the storeroom that will be sent for processing. To do this, click on the button and, on the screen that will be displayed, select the desired items/supplies/wastes of the storeroom. Then, in the Quantity column field of the selected objects, enter the number of objects that will be processed. Note that the value entered in the "Quantity" column field must be EQUAL or LESS to the value displayed in the Available qty. column. Once done, save the record.
|
7.
|
In the Destination tab of the record list at the bottom of the Record data General data section, it is possible to add the objects resulting from processing in the addressee storeroom. To do this, click on the button and on the row that is displayed, fill in the following fields:
Field
|
|
Item/Waste/Supply
|
Note that the name of the field will vary according to the type of object being placed into the storeroom. Select the item/waste/supply you wish to store in the storeroom.
|
Location
|
Select the location/repository in which the object should be stored. Use the other buttons located next to the field, to create a new storage place or clear the filled out value. Remember that, according to the configurations set in the storeroom, the object storage may be restricted to determined locations/repositories.
|
Quantity
|
Enter the quantity of the object that will be stored in the storeroom. Remember that, if the storeroom in question has a delimited maximum capacity, the entered quantity may not be greater than the maximum configured capacity.
|
Batch
|
This field will only be enabled if, on the item, supply, or waste data screen (in the respective components), the "Control lot #" option is checked. Enter the batch number of the object that is being joined.
|
Serial #
|
This field will only be enabled if, on the item, supply, or waste data screen (in the respective components), the "Control serial #" option is checked. Enter the serial number of the object that is being joined.
|
Validity
|
This field will only be enabled if, on the item, supply, or waste data screen (in the respective components), the "Control lot #" or "Control serial #" option is checked. Select the date until the lot or series of the object being joined is valid.
|
▪Include the number of lines that corresponds to the number of objects that will be moved into the storeroom. ▪To delete a line, check the checkbox next to the object you no longer wish to move into the storeroom and click on the  button of the side toolbar. button of the side toolbar. ▪After adding all necessary objects, save the record. |
|
8.
|
In the Description section, enter relevant information about the processing that will be performed.
|
9.
|
The Attribute section will only be displayed if an attribute is associated in the Attribute tab of the event configuration data screen. In this case, enter the value of the attributes that complement the processing. Those attributes that are required must, necessarily, have their values filled in. The blocked attributes will be filled in by the system with the default value set when it is associated with the event configuration. Remember that the procedure to fill out an attribute, varies according to the configurations established when the attribute was registered.
If the storeroom whose objects will be sent to processing does not have a configuration associated with it, this section will not be displayed.
|
|
10.
|
The Record data Approval section will only be displayed if it has been set in the Event configuration, associated with the storeroom, that the object processing have to go through the approval step. In that case, it is possible to view and define the party responsible for the approval of the processing being performed. Completing the information in this section depends on the route type selected in the event configuration. If it is a "Fixed & unique" route, this section may not be edited. The following fields are available:
Field
|
|
Responsibility route
|
Select the responsibility route for the approval of the processing. If the approval route set in the configuration is "Fixed", it will only be possible to define another route through this field, however, it will not be possible to edit its members. Note that only the approval responsibility routes will be available for selection.
|
Approval type
|
This field is filled out by the system with the approval type (Incremental or Circular) defined at the time of the creation of the previously selected responsibility route, however, it is possible to edit it.
|
Cycle
|
This field is filled in by the system with a sequential number indicating the approval cycle that the processing is going through. Each time that the event is rejected and goes through approval again, the system assigns a number to it. Select the previous cycles to view the members of the responsibility route that performed the approval.
|
Wait for all members approval
|
This option will be checked/cleared by the system, according to the configurations made at the time of the creation of the responsibility route selected previously. If this option is checked, the approval will only be released after all route members execute their tasks.
|
▪If the approval of the route type defined in the configuration of the processing is "Variable," the toolbar buttons located next to the list of records will be enabled. Use them to add, edit or delete the responsible for the approval. ▪Note that by adding a new responsible user to a route associated with the approval of the processing, this addition will only be valid for this approval and will not be replicated to the route record made by the Configuration Responsibility route menu. |
|
11.
|
Use the Record data Documentation section to associate attachments and documents related to the processing.
Field
|
|
Attachment
|
Use this section to associate the attachments related to the event. Refer to the Adding attachments section for further details on how to add and/or associate attachments.
|
Document
|
Use this section to add or associate the documents related to the event. See the Adding documents section for further details of how to add and/or associate documents from SE Document.
|
|
12.
|
After filling in all the necessary fields, click on the  button. button.
|
13.
|
At this point, the system will ask whether you wish to send the processing to the next step. Choose the desired option:
▪OK: If in the configuration is set that the processing will have approval, the system will generate the Processing approval task to the appropriate responsible. If in the approval step is not configured or the storeroom does not have a configuration associated with it, the processing will be Closed, and the resulting objects of the process will be added to the destination storeroom. ▪Cancel: The processing will remain pending, with the Issue status. |
|